

This update is a big one — we’re talking two quarters worth of new features covered in this one blog post!
In the past six months, we focused on two key outcomes for Nexus users: more control over what happens after a credential is issued, and more places your credentials are accepted.
In this update:
- Reviewing and approving credentials before issuance, and choosing exactly which credential is emailed, added to a recipient’s Nucleus account, or sent to their Skills and Workforce Development Agency (SWDA) Career & Skills Passport (CSP) account
- Updated standards support, so your verifiable credentials are accepted in more places
- Issuing mDocs (Mobile Documents) yourself, so a credential can sit in a wallet app on your recipient’s phone
- A clearer view of account ownership on Nucleus, so recipients can see their account is theirs
Let’s dive in!

Nexus
Nexus received nine whopping updates! All to give you more control over your issued Verifiable Credentials (VCs), greater ease of keeping Workflow Runs tidy across your many users, and wider acceptance for your VCs.
Workflows: Review and ApproveNew
Review and Approve lets you add an approval step to a Workflow, so users who are responsible for signing off on credentials (reviewers) can check every VC before you issue them. The Workflow pauses when it reaches this step for the reviewers to approve or reject each VC. The run only continues if every document is approved.
Here is how to set it up.
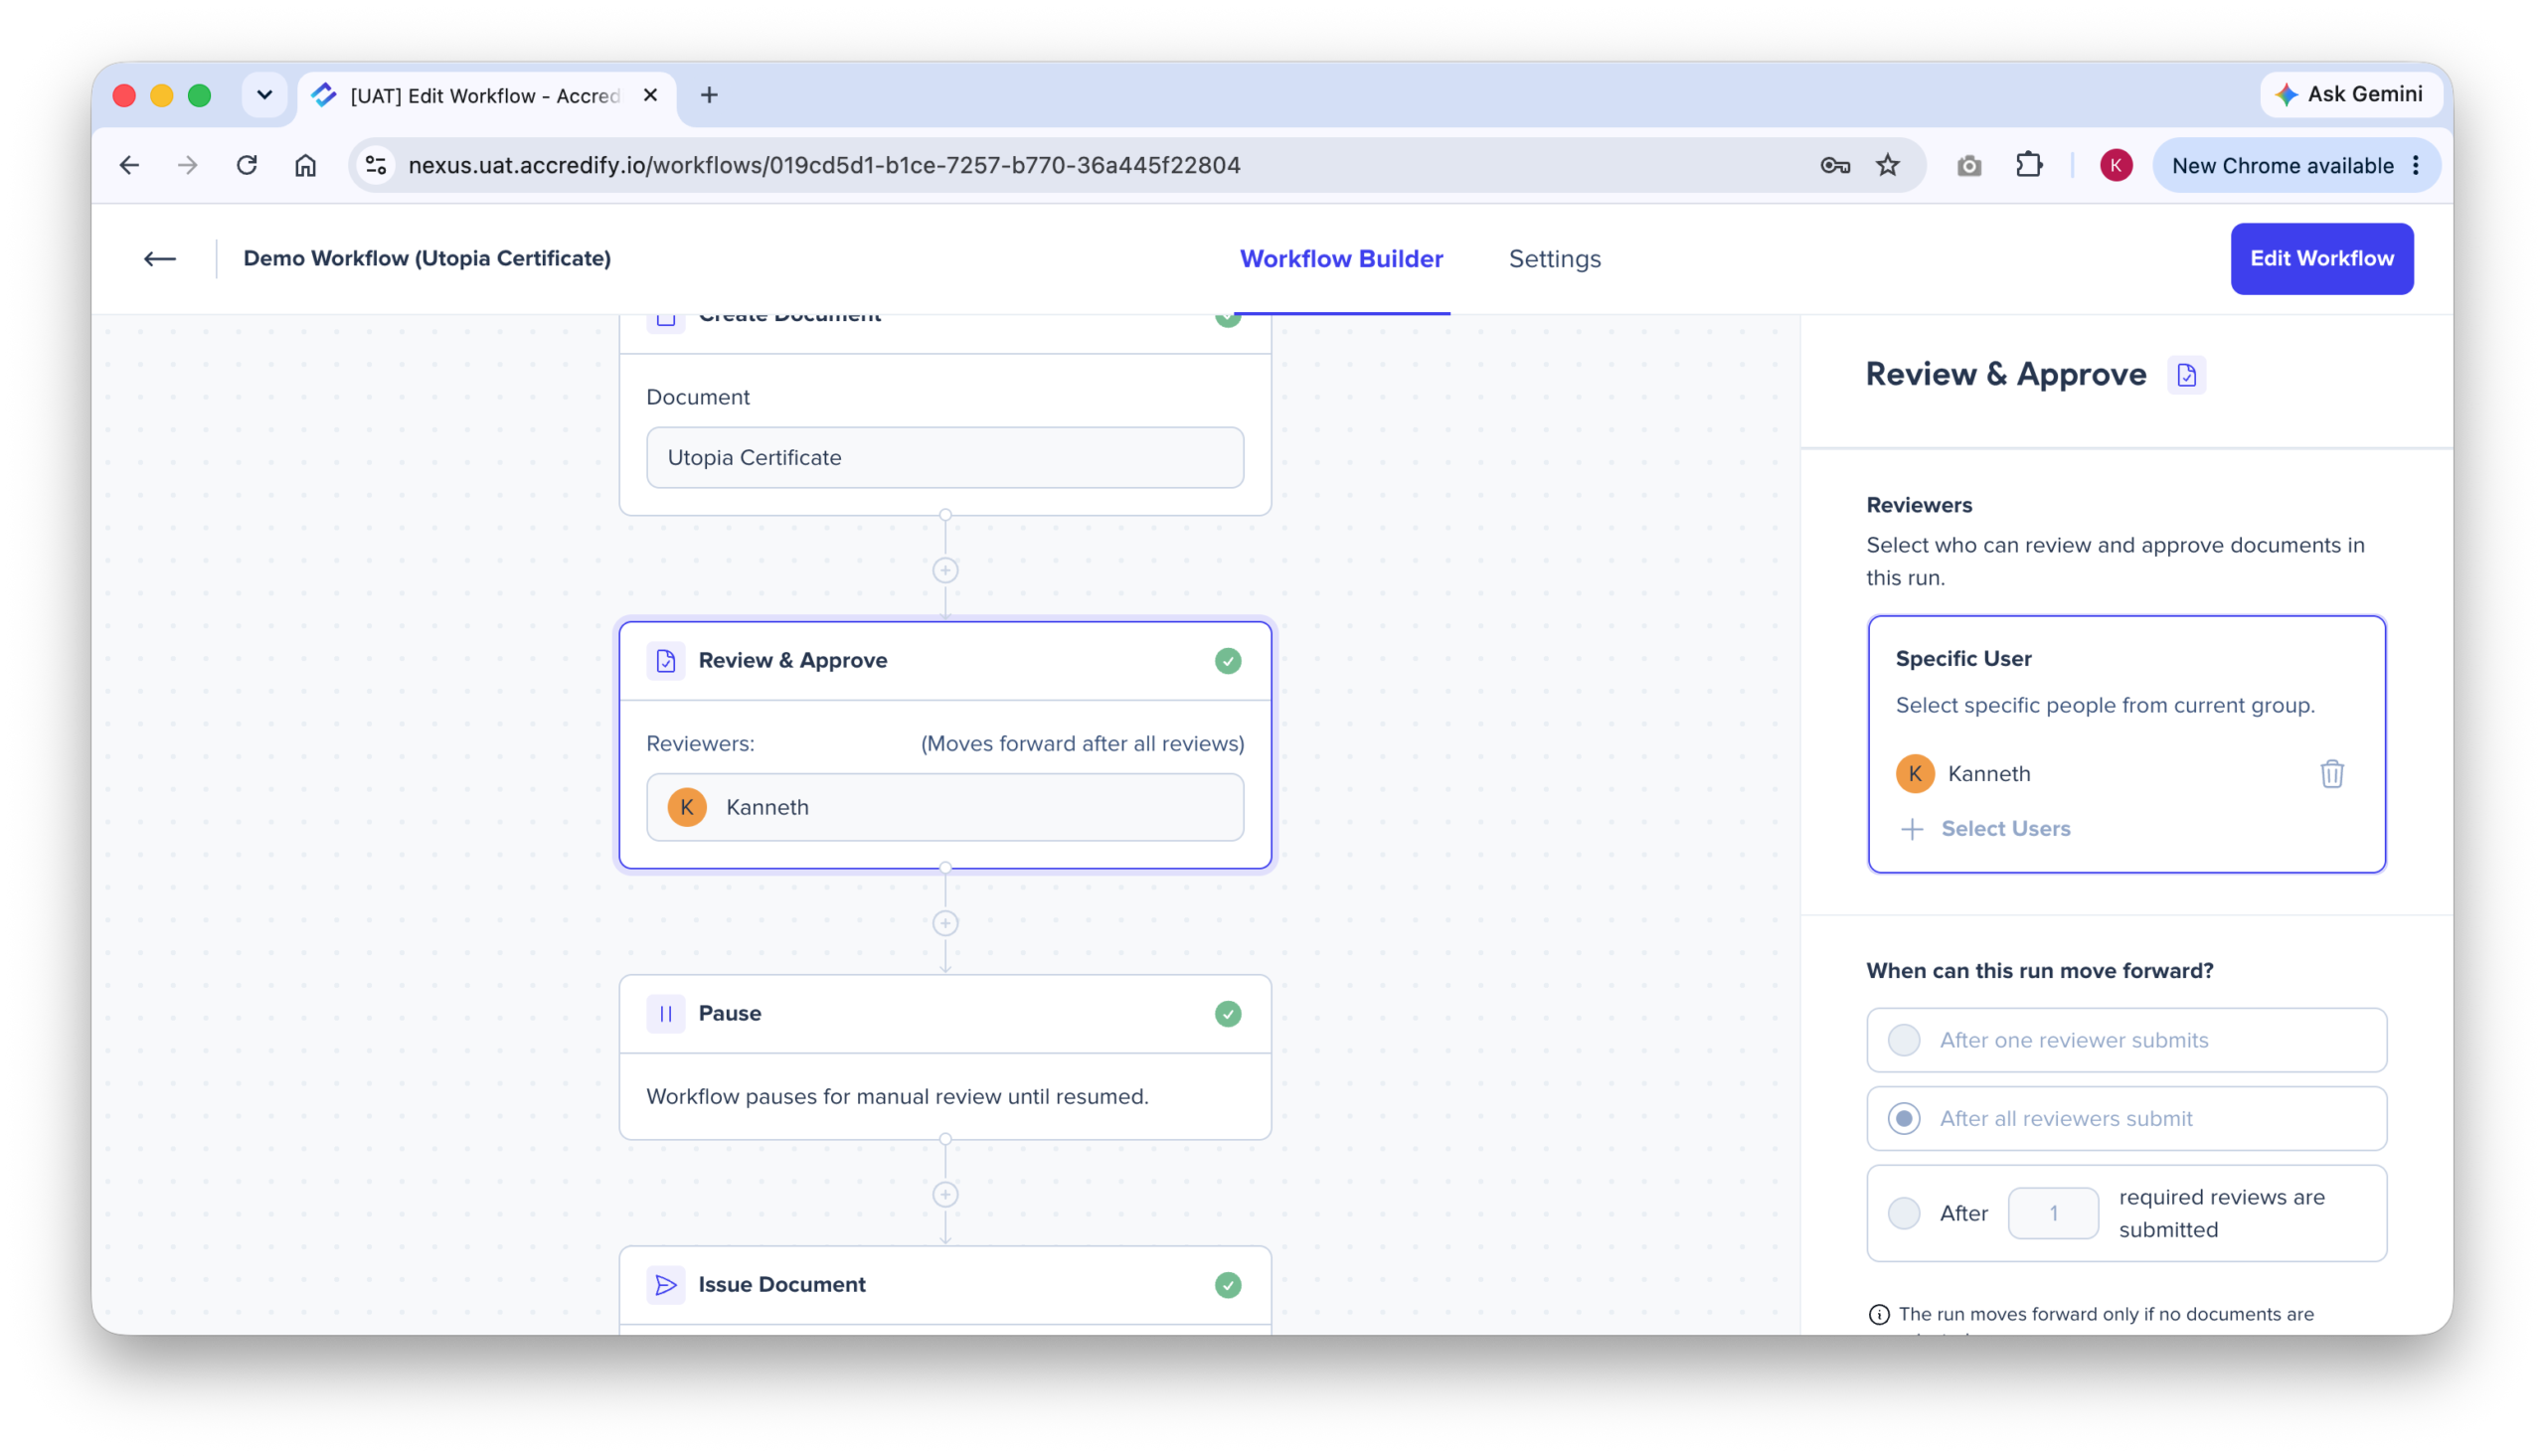
- 1 Edit an existing Workflow, or create a new one.
- 2 Place the Review and Approve action after Create Document and before Issue Document. It has to sit between the two. VCs need to exist before anyone can review them, and once they have been issued the only thing that can be done is to revoke them.
- 3 Assign your reviewers, and set the rule for how many of them must approve before the Workflow can resume. You can require every reviewer to approve, or you can set the number of approvals needed.
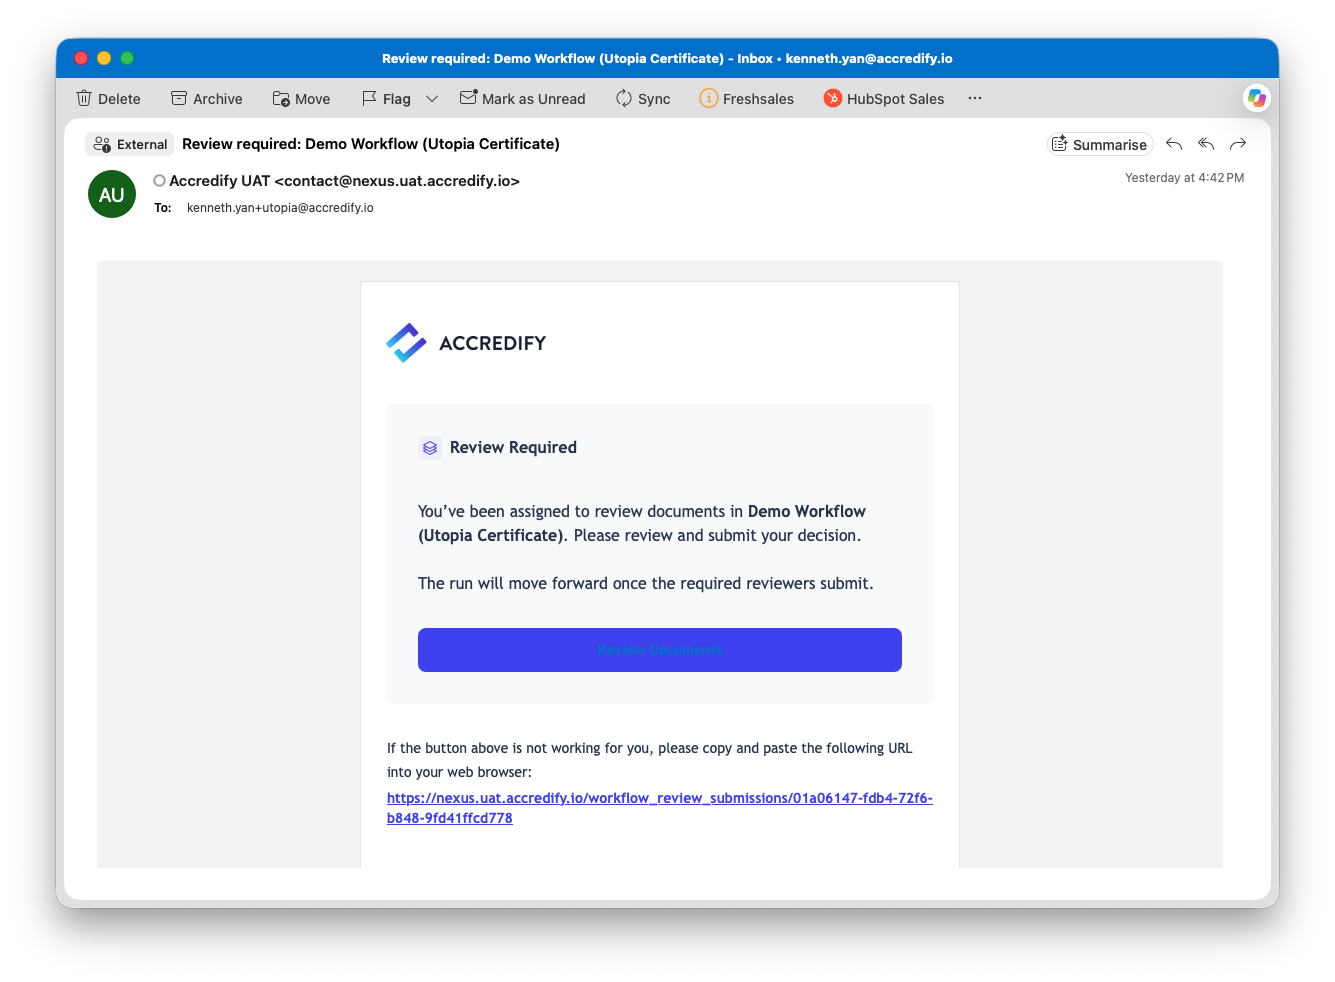
When you trigger a Workflow Run, it’ll stop at Review and Approve. At this stage, all reviewers will receive a notification email to review the VCs created by that Workflow. That email contains a link that leads reviewers to the Review and Approve page on Nexus. A reviewer can also reach the page by logging in to Nexus directly and clicking on the Review notification in their notifications box.
On the Review and Approve page, reviewers will see a preview of every VC the run has created. They can work through the VCs one at a time, or approve and reject them in bulk.
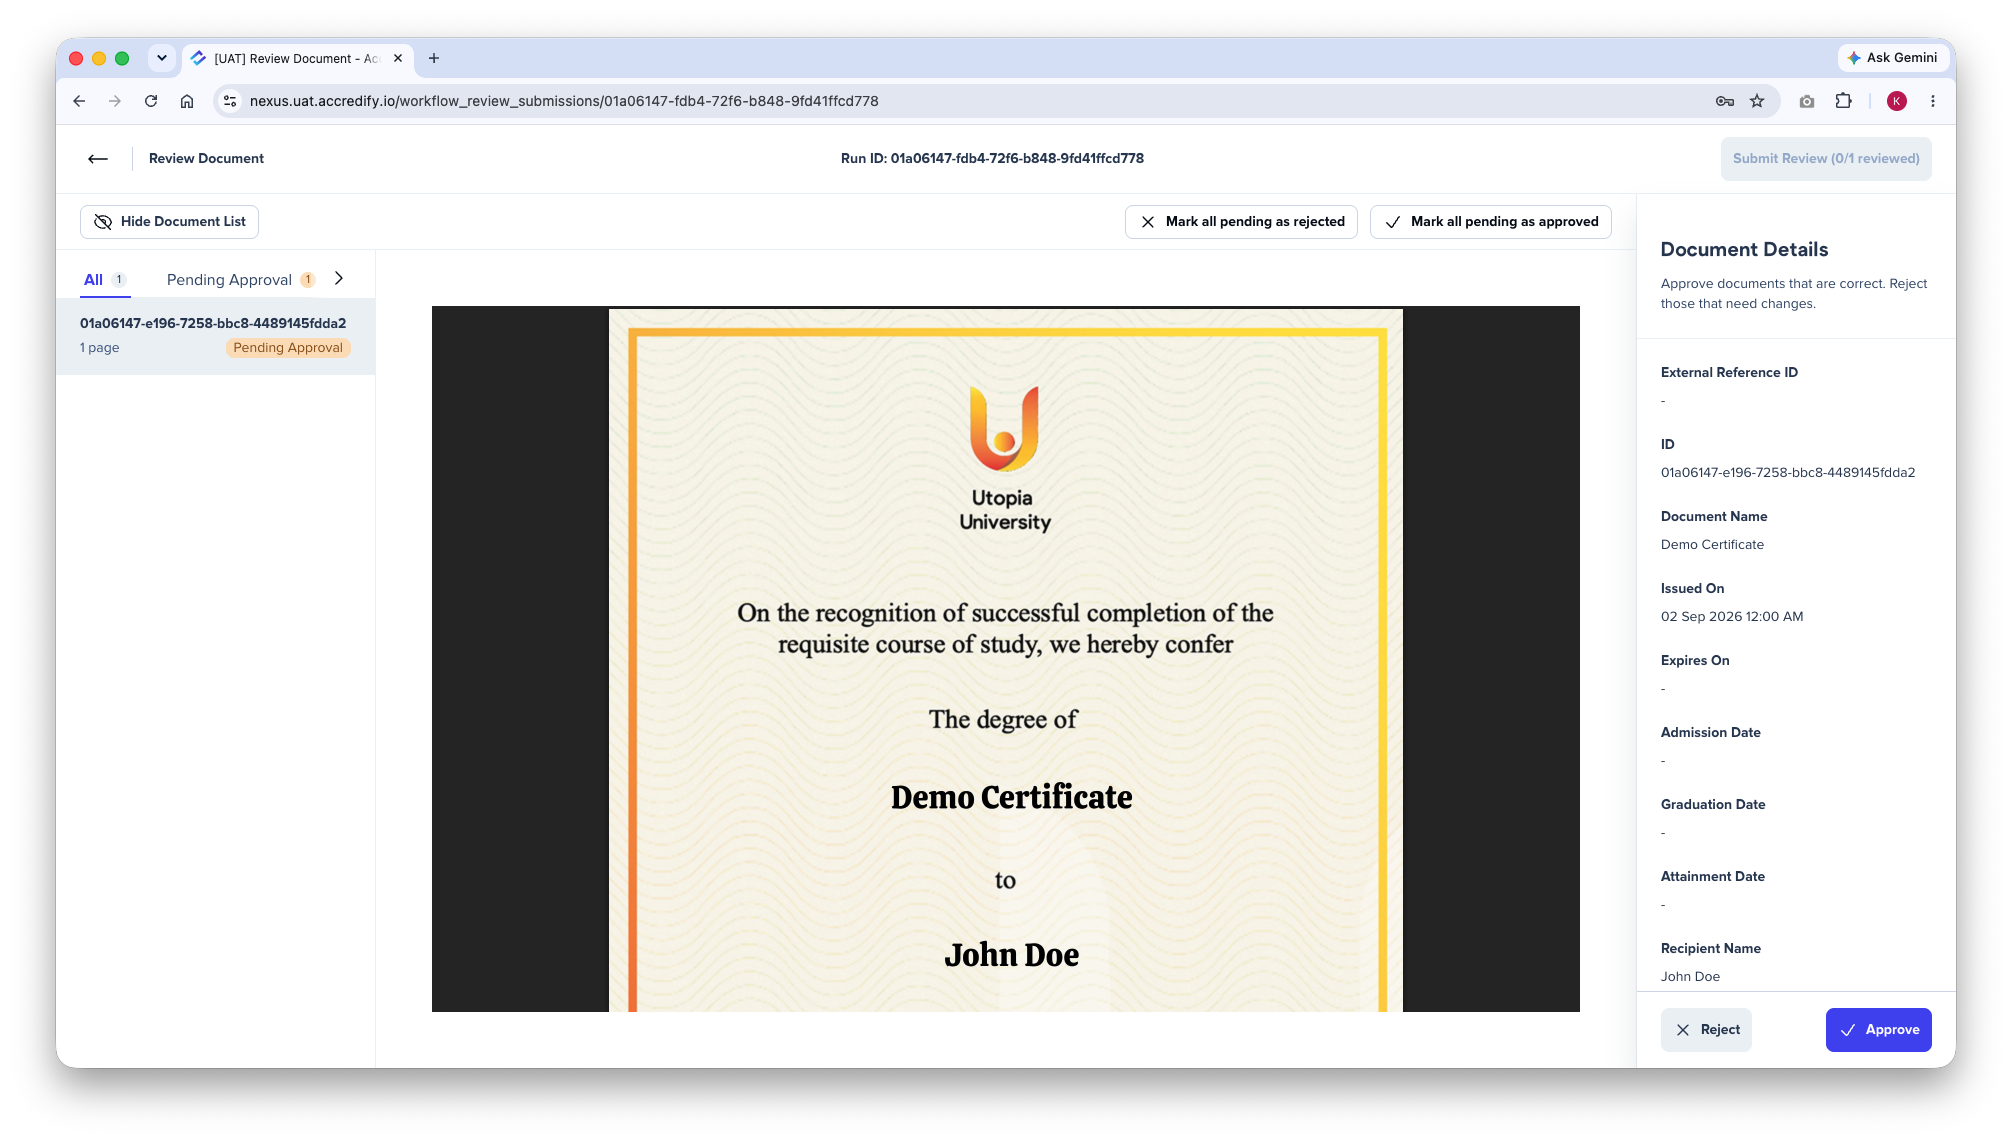
A tab on the left navigation bar sorts the documents by review status (all, pending, approved or rejected), so a reviewer working through a large issuance batch can see which VCs have not been reviewed yet. Any rejected VC will require the reviewer to include a reason, so the issuing user can rectify the issue before running the Workflow again. Approved VCs will display an Approved pill beside it. Both decisions can be changed at any time with Change Decision, right up until the review is submitted.
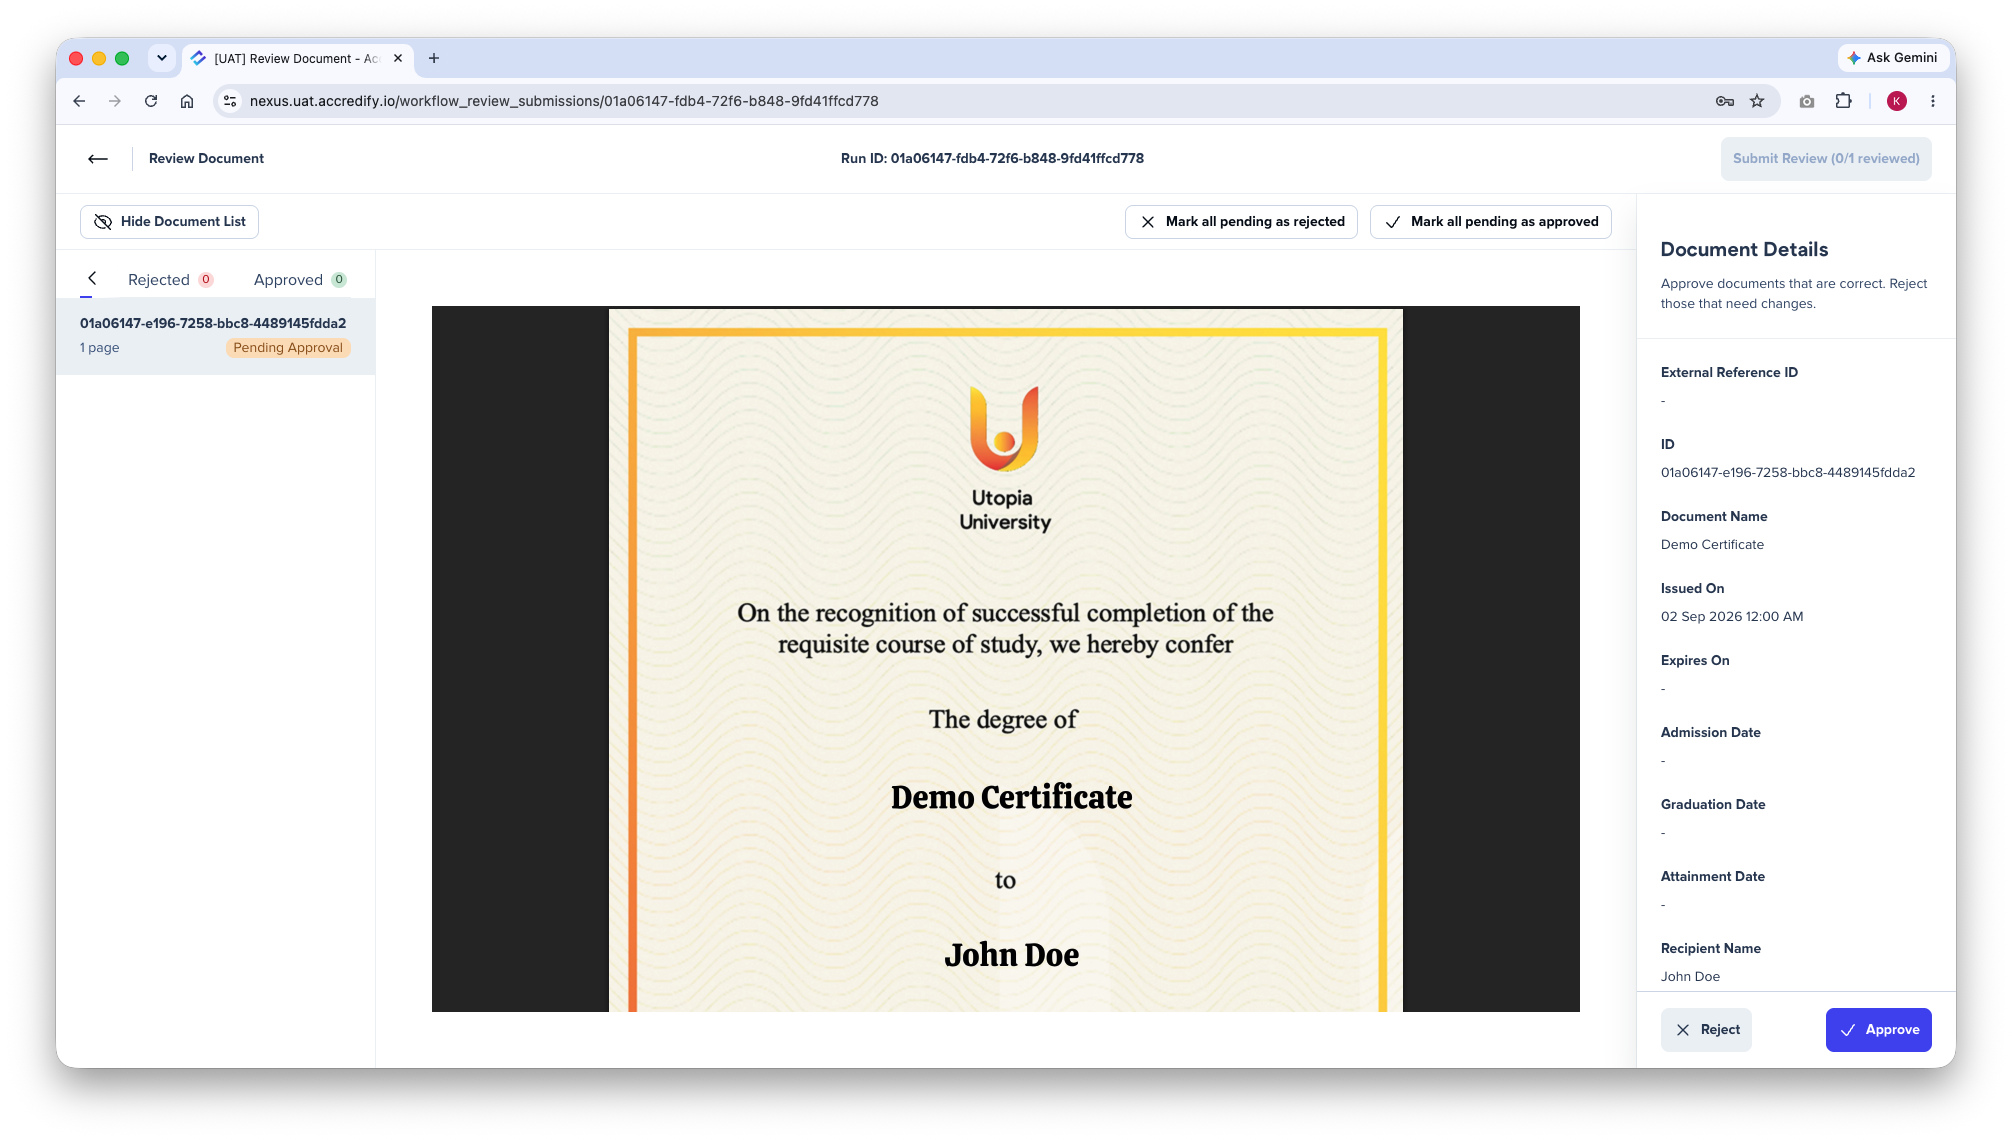
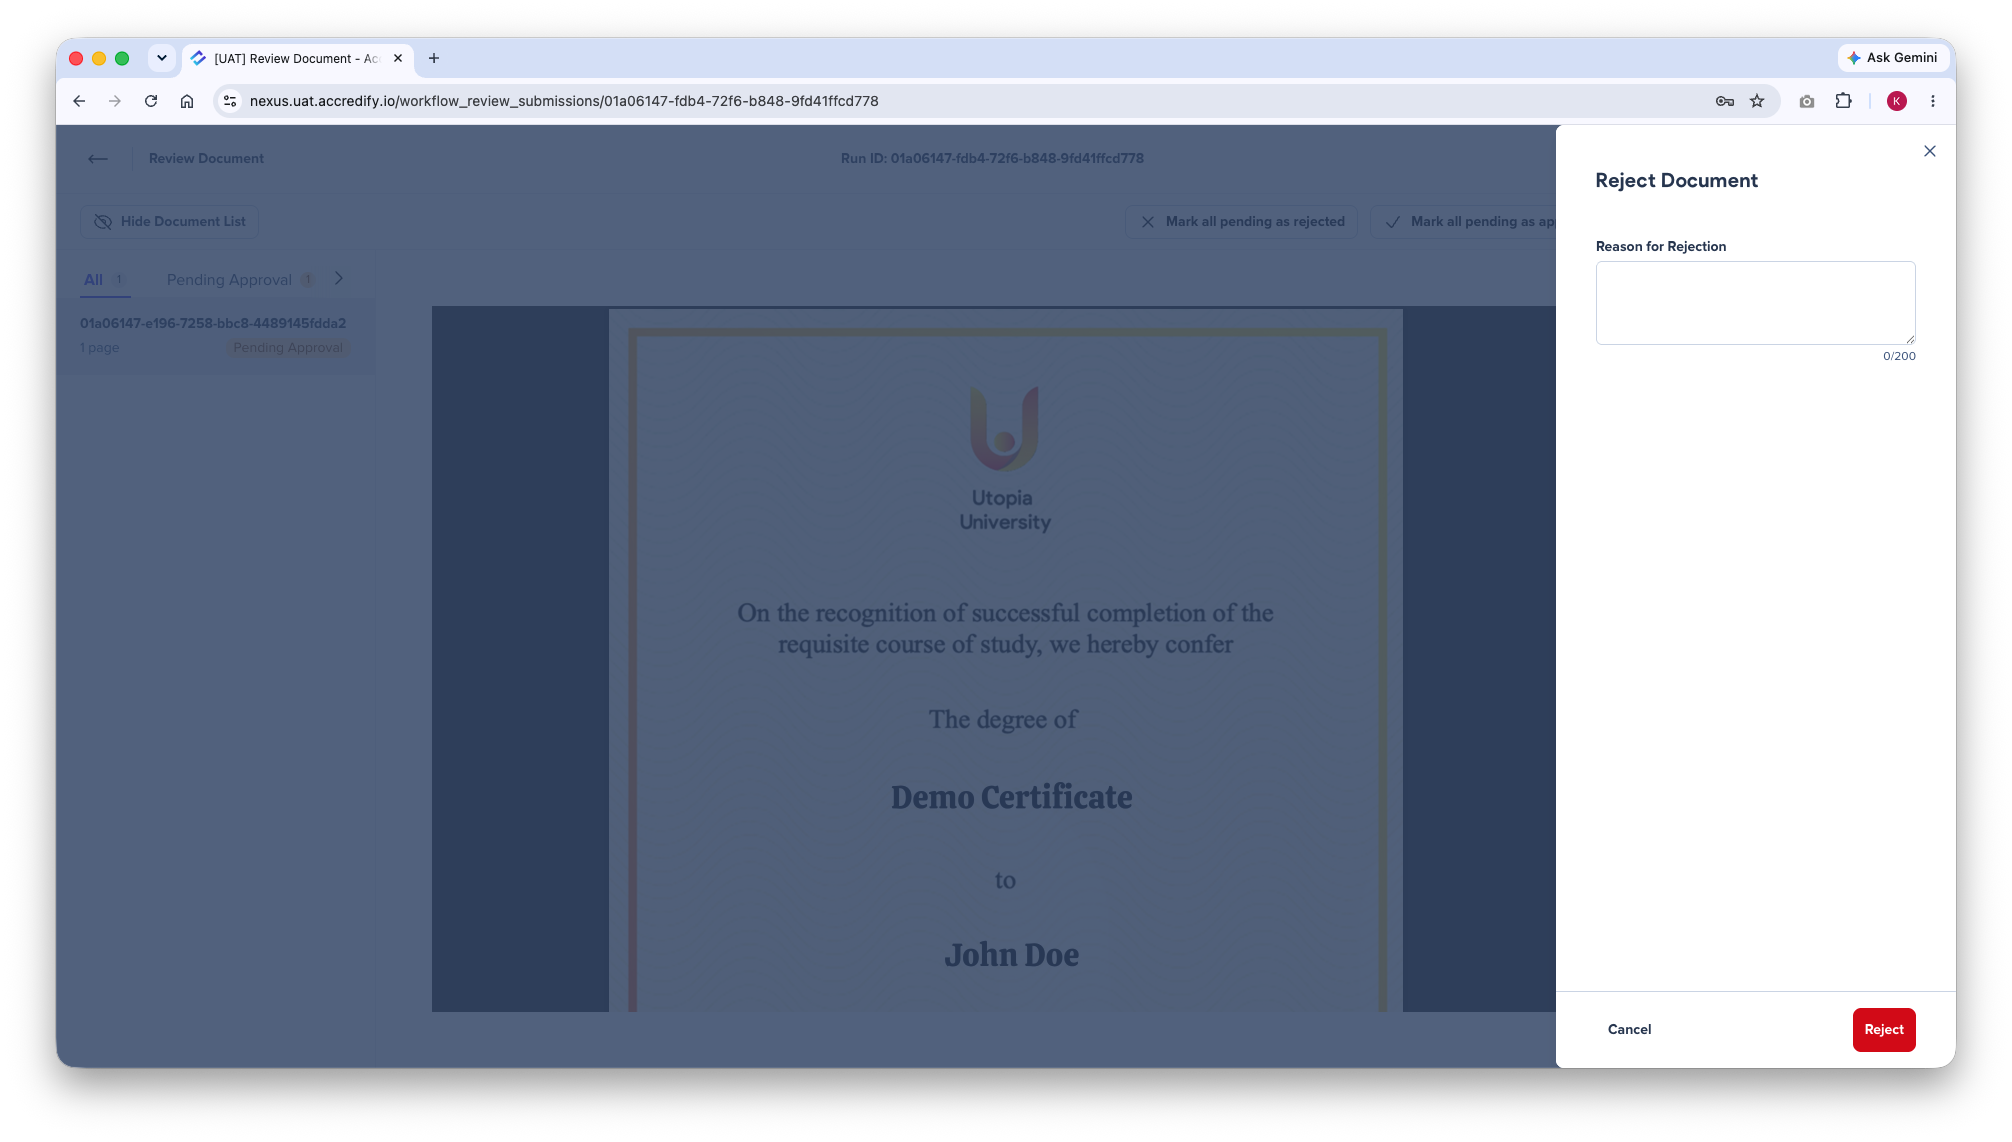
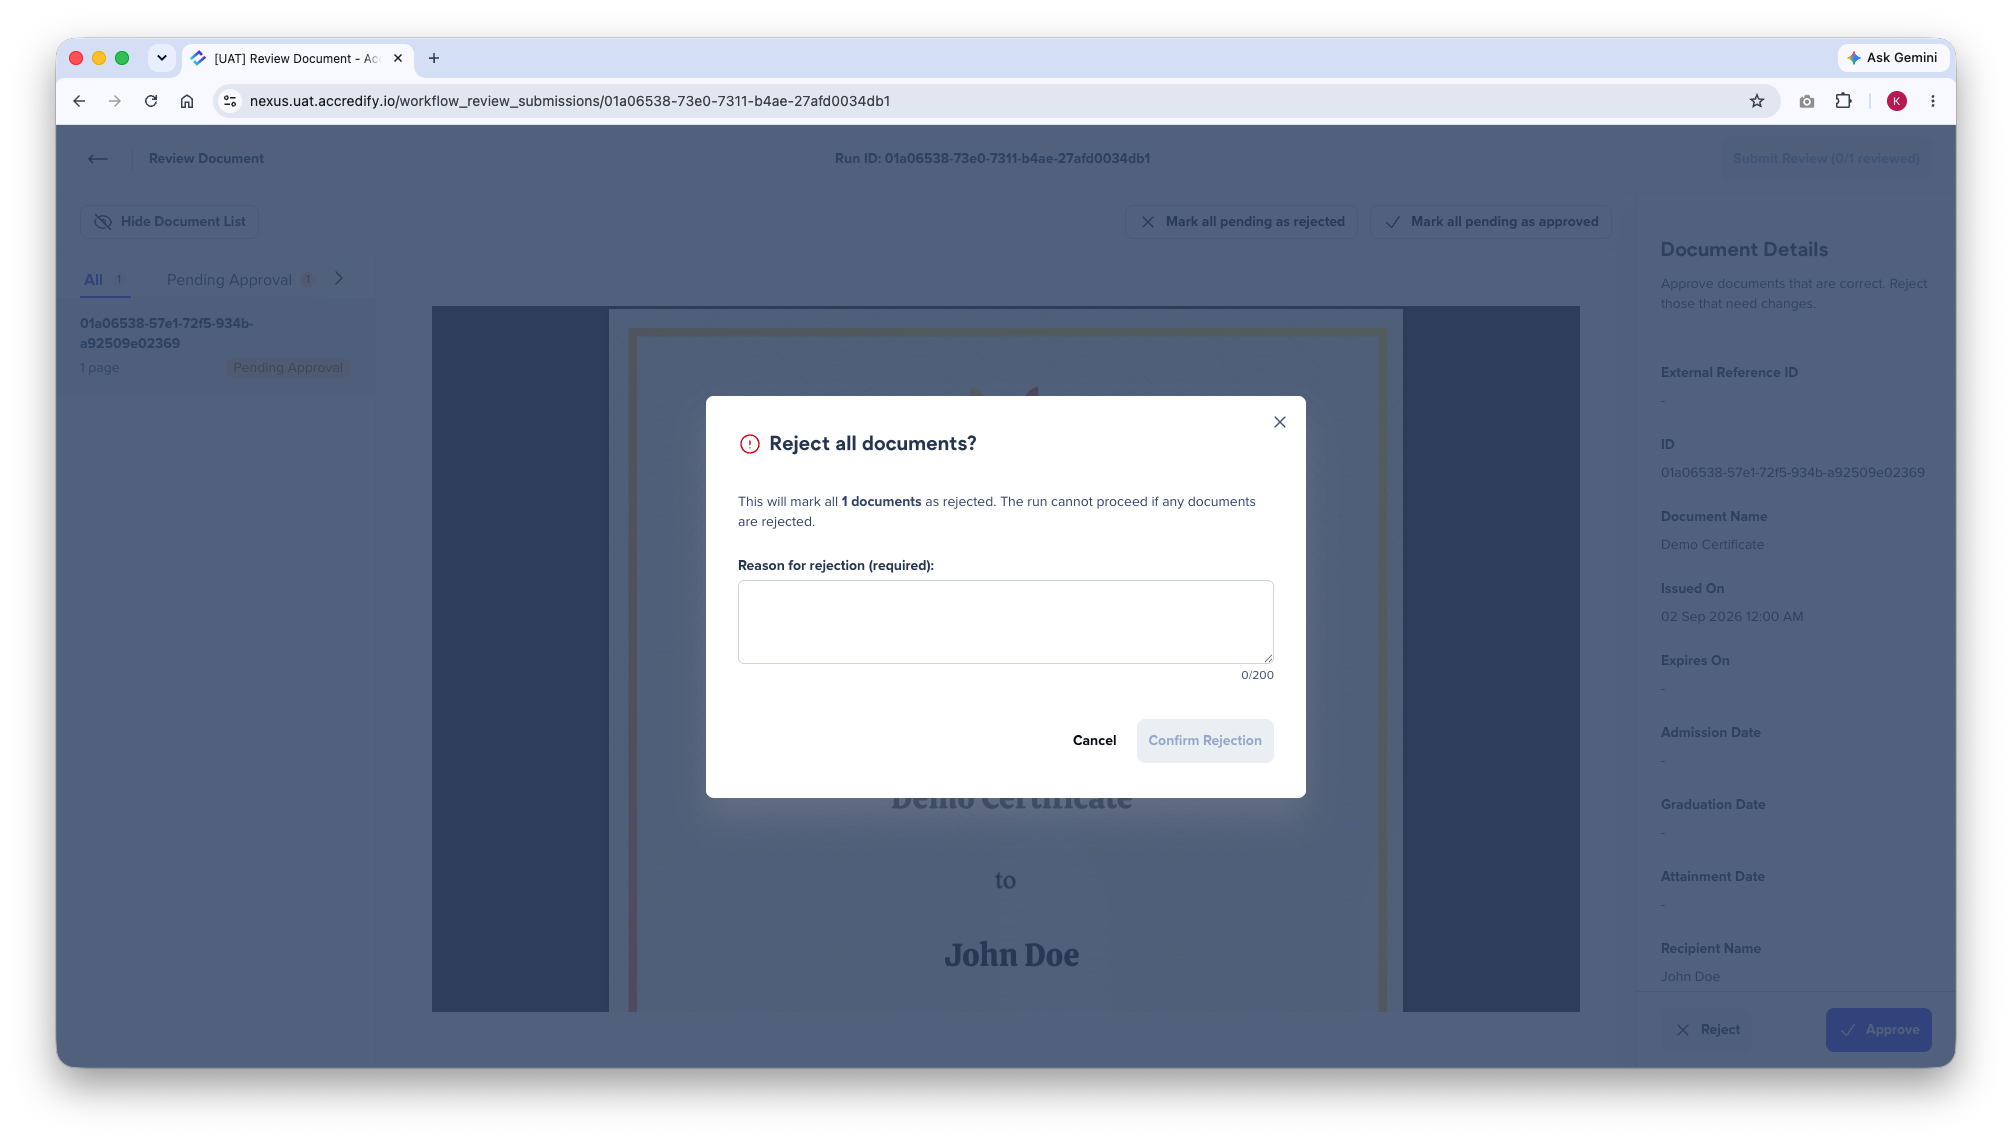
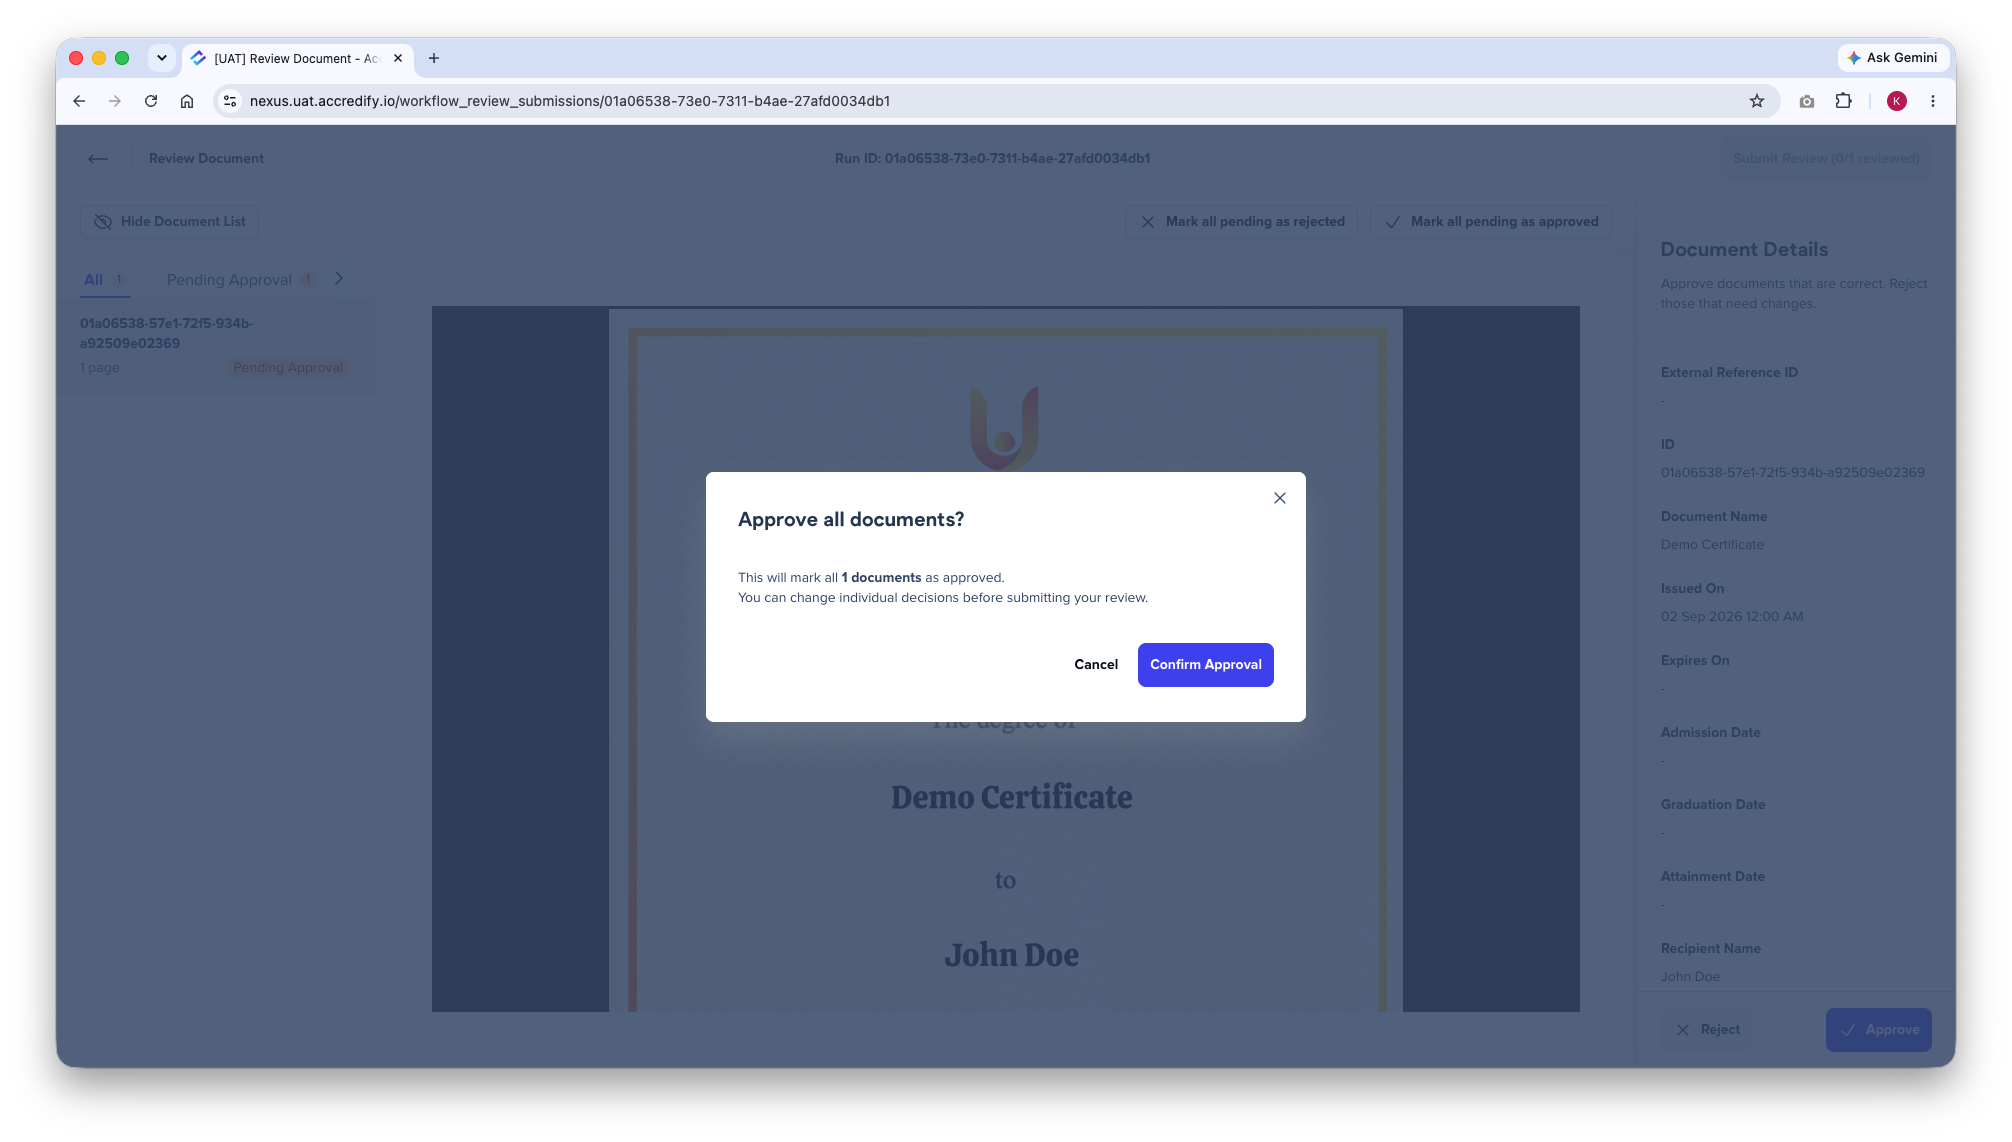
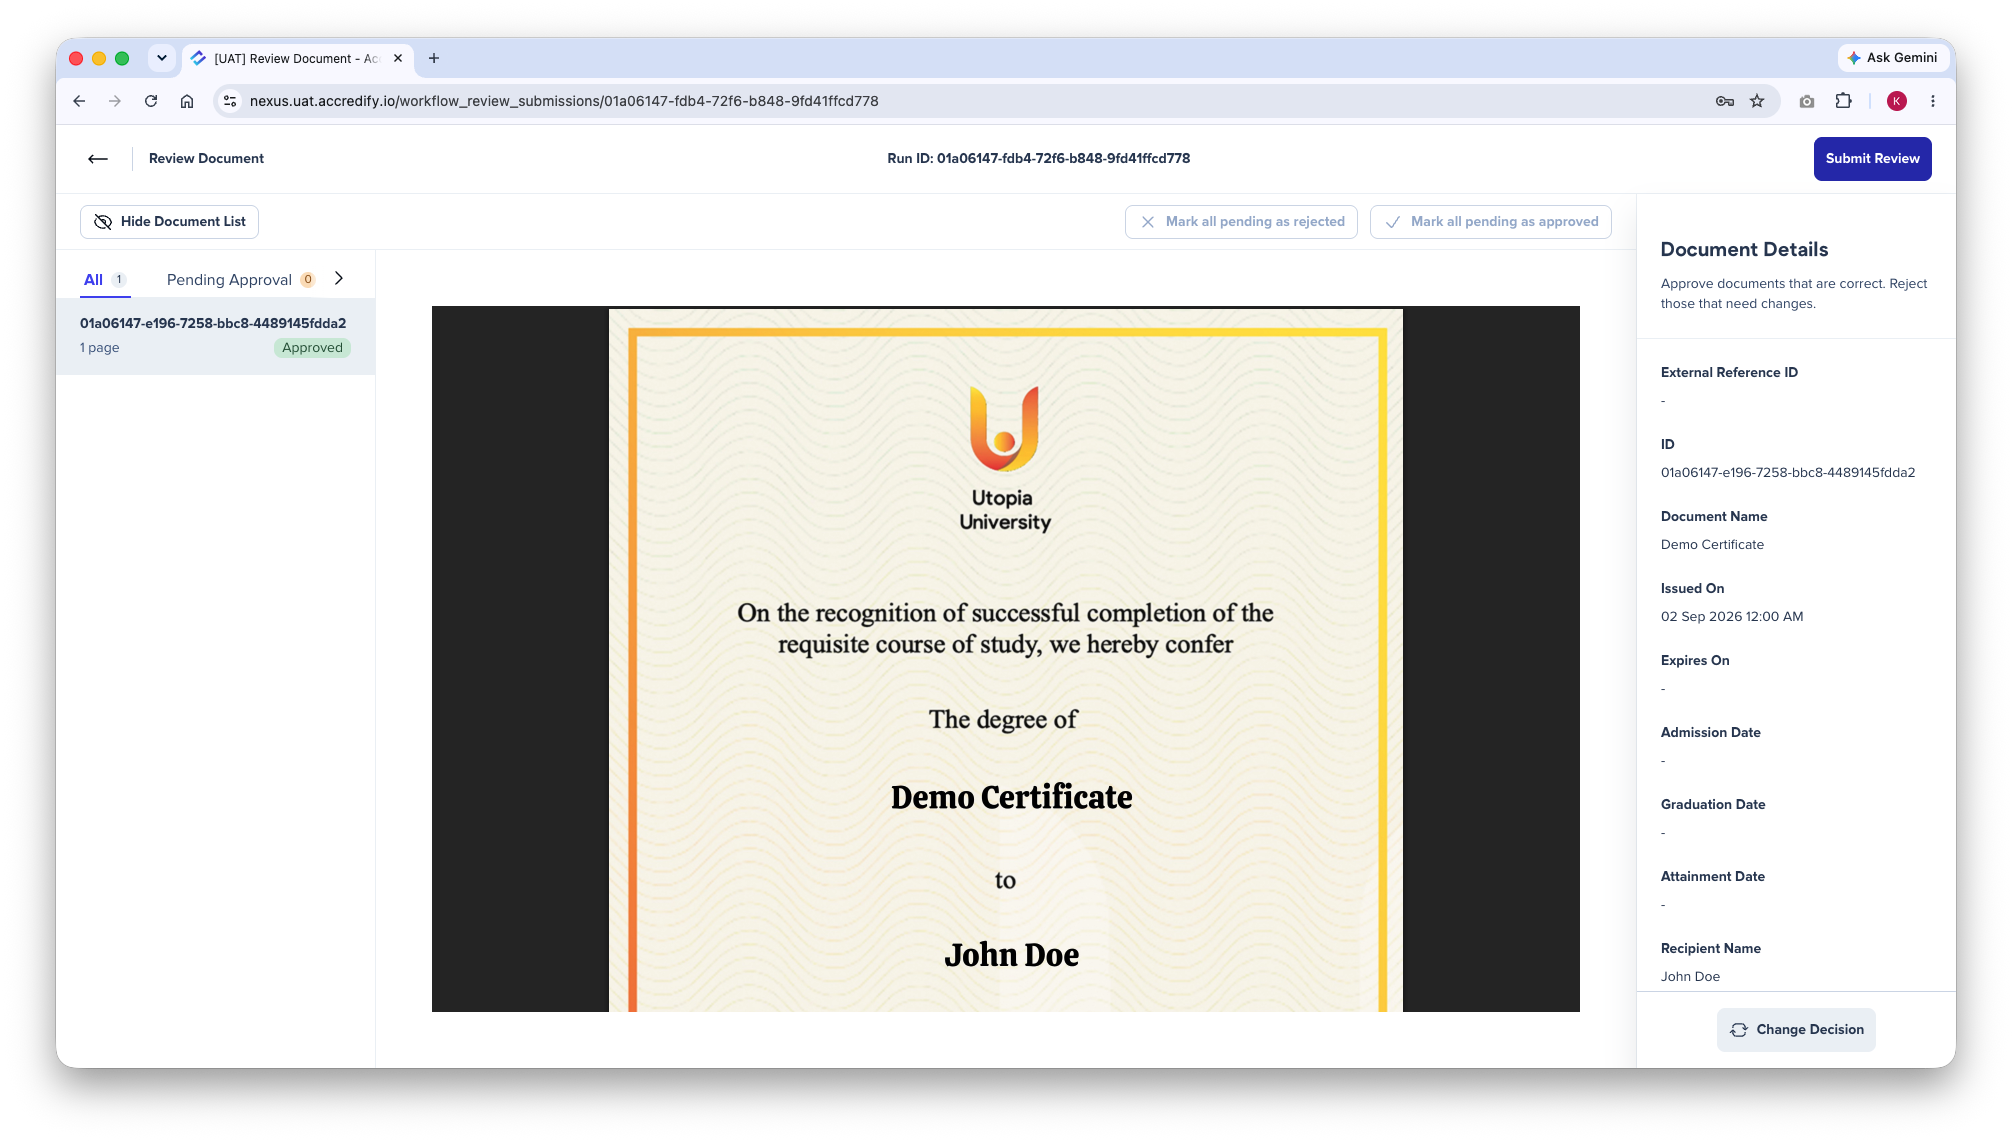
Once every credential has been reviewed, reviewers just need to click Submit Review. If every credential was approved, the Workflow will automatically proceed with all its remaining steps. A single rejection will cancel the entire Run, and the user who triggered the Run will be notified so they can address the reasons for rejection and trigger the Workflow again with rectified inputs.
Reviewers do not need specific Permissions to review. They only need to have access to Nexus. Once a user has been assigned to review under the Review and Approve card, the user will receive notification emails to review VCs and also access the review page.
Roles and Permissions decide who can review, and who can see what across a large institution.
More about Groups, Roles & Permissions →Workflows: Manual Post-issuance ActionsNew
Manual Post-issuance Actions let you decide what happens to each credential after it has been issued. Until now, actions in a Workflow applied to the entire batch in bulk. This means there was no way for users to control, at a VC-level, which recipient got their VC emailed to them, added to their Nucleus account, or uploaded to SWDA’s Career & Skills Passport. With Manual Post-issuance Actions, users can now control all of the above!
When would anyone use this? Well, two scenarios come to mind:
- For institutions who need to ensure VCs are only sent to students after full payment has been made for their courses
- For institutions who would like to send follow-up emails to the same batch of recipients to remind them to do an action, e.g. share their VCs on LinkedIn.
Here is how to set it up.
- 1 Edit an existing Workflow, or create a new one.
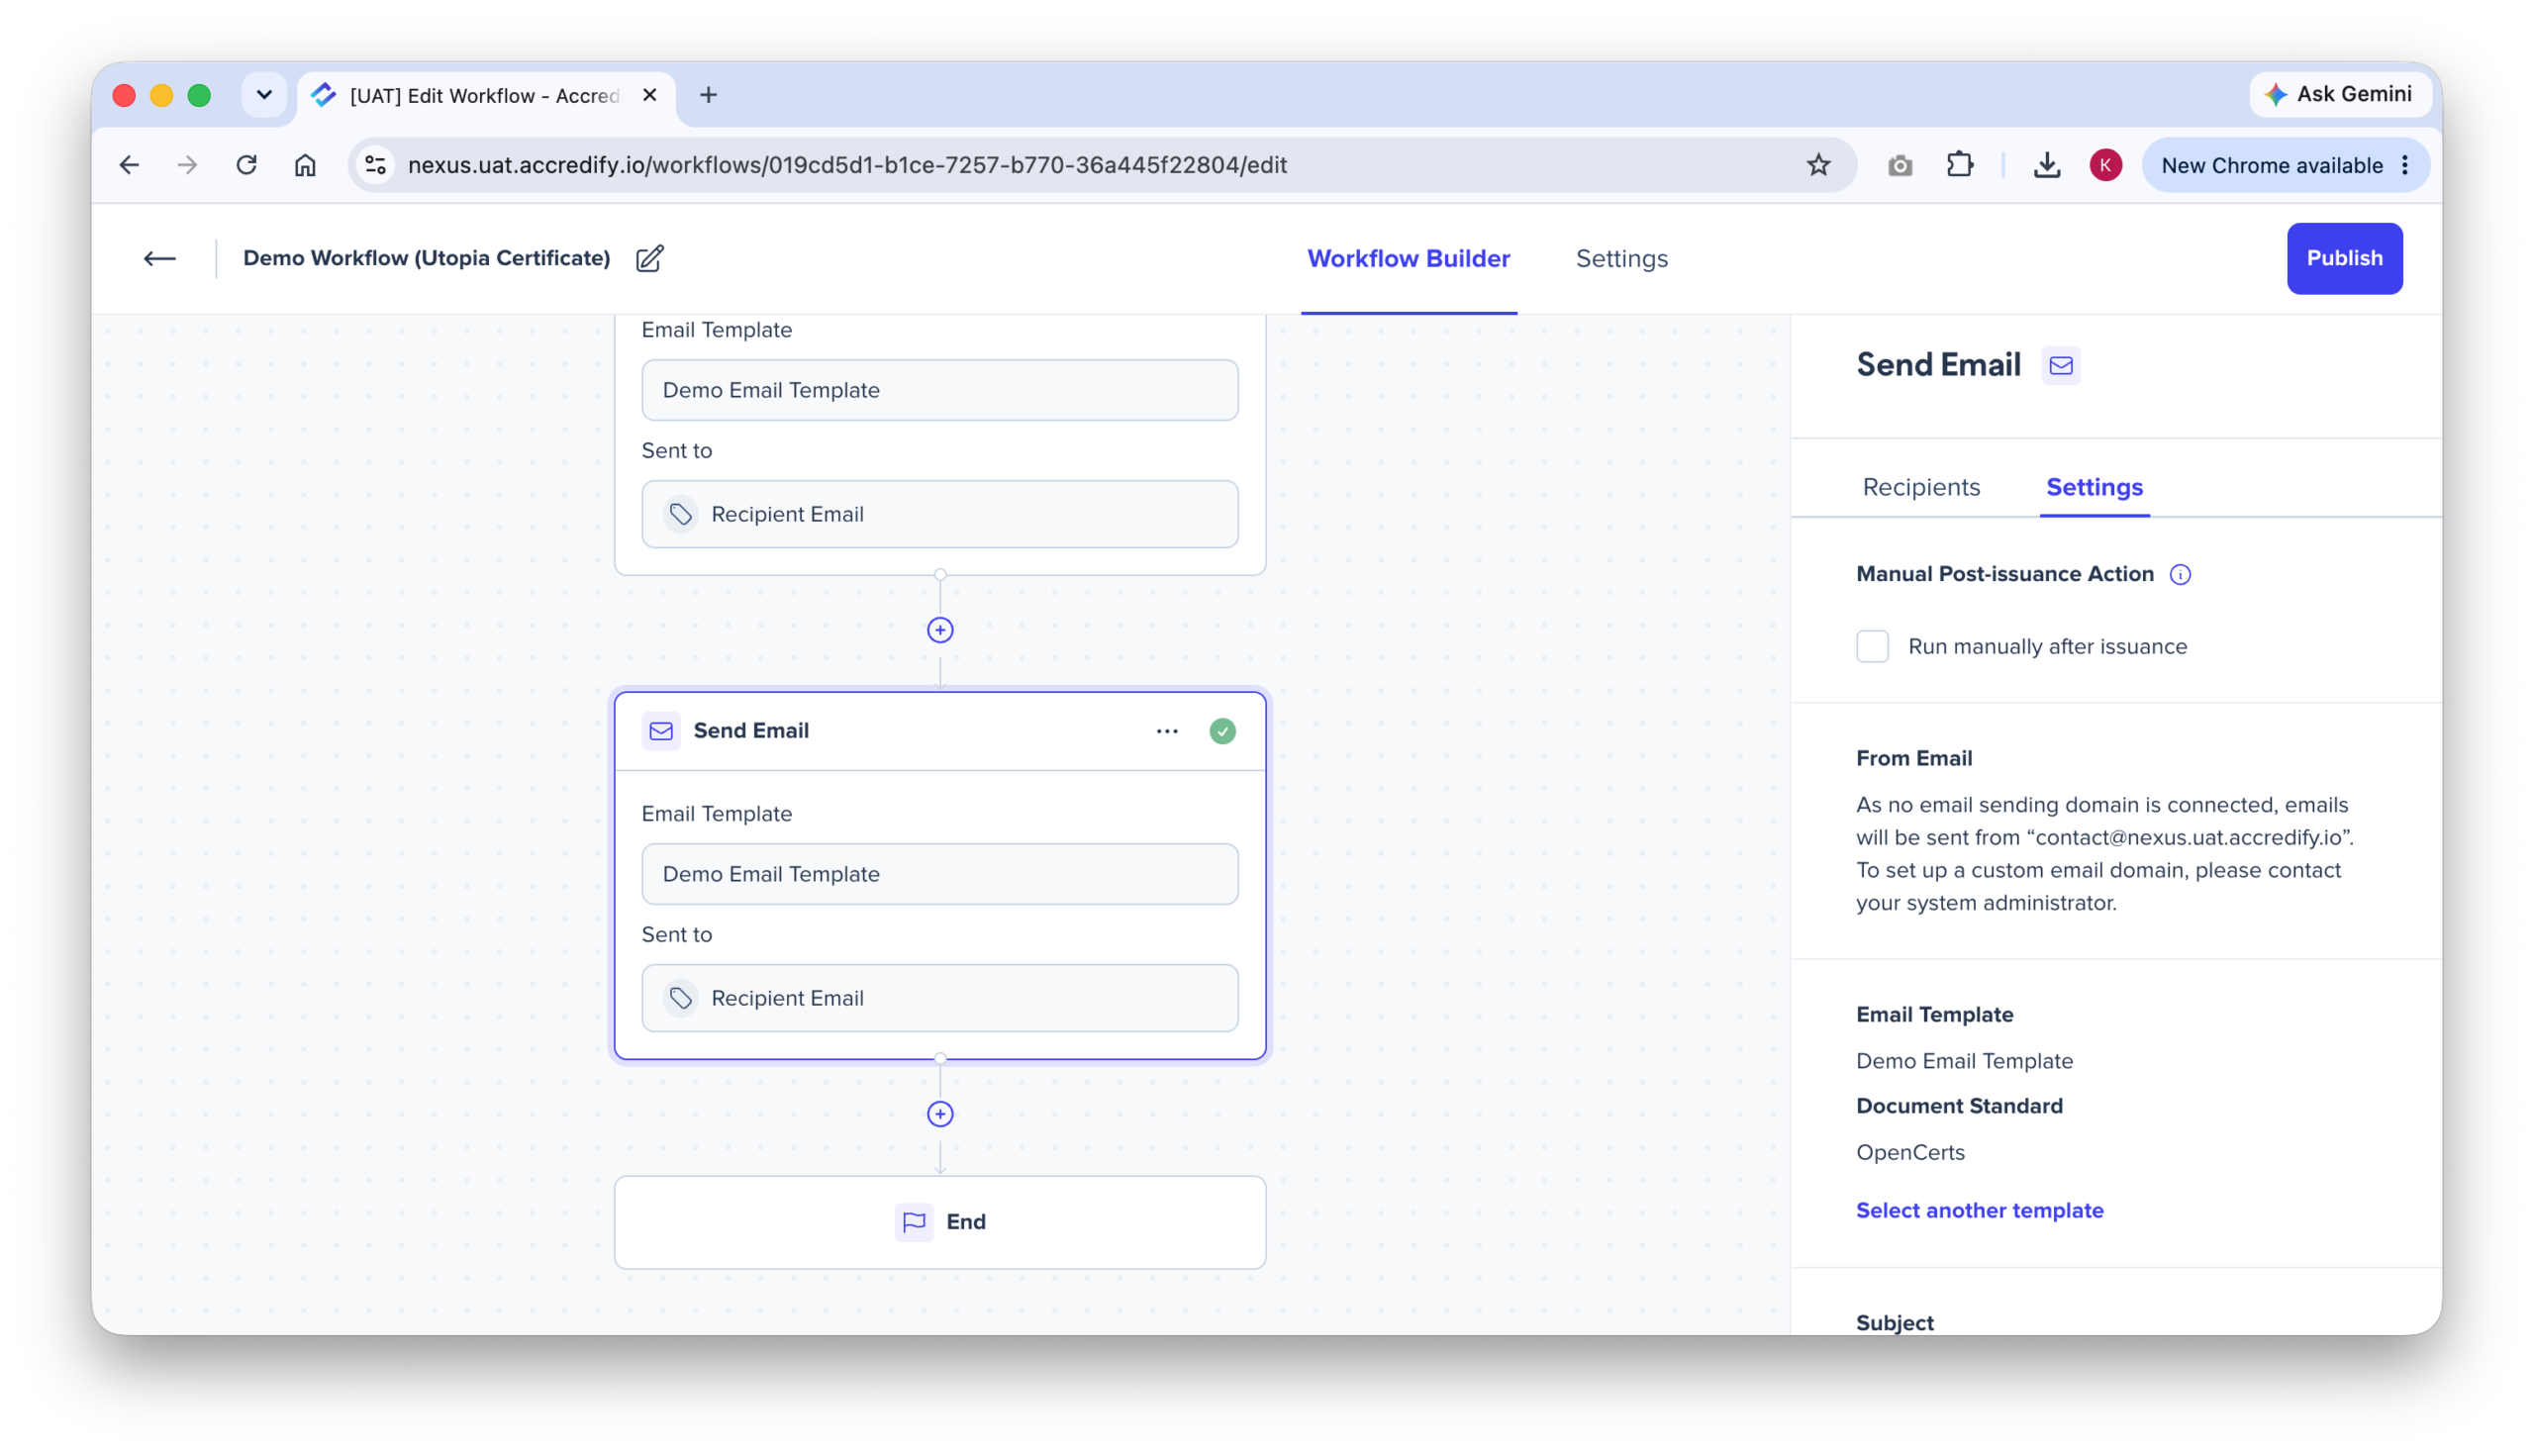
- 2 In any post-issuance action card (Send Email, Create Nucleus Profile or Add to Careers & Skills Passport), tick Run manually after issuance.
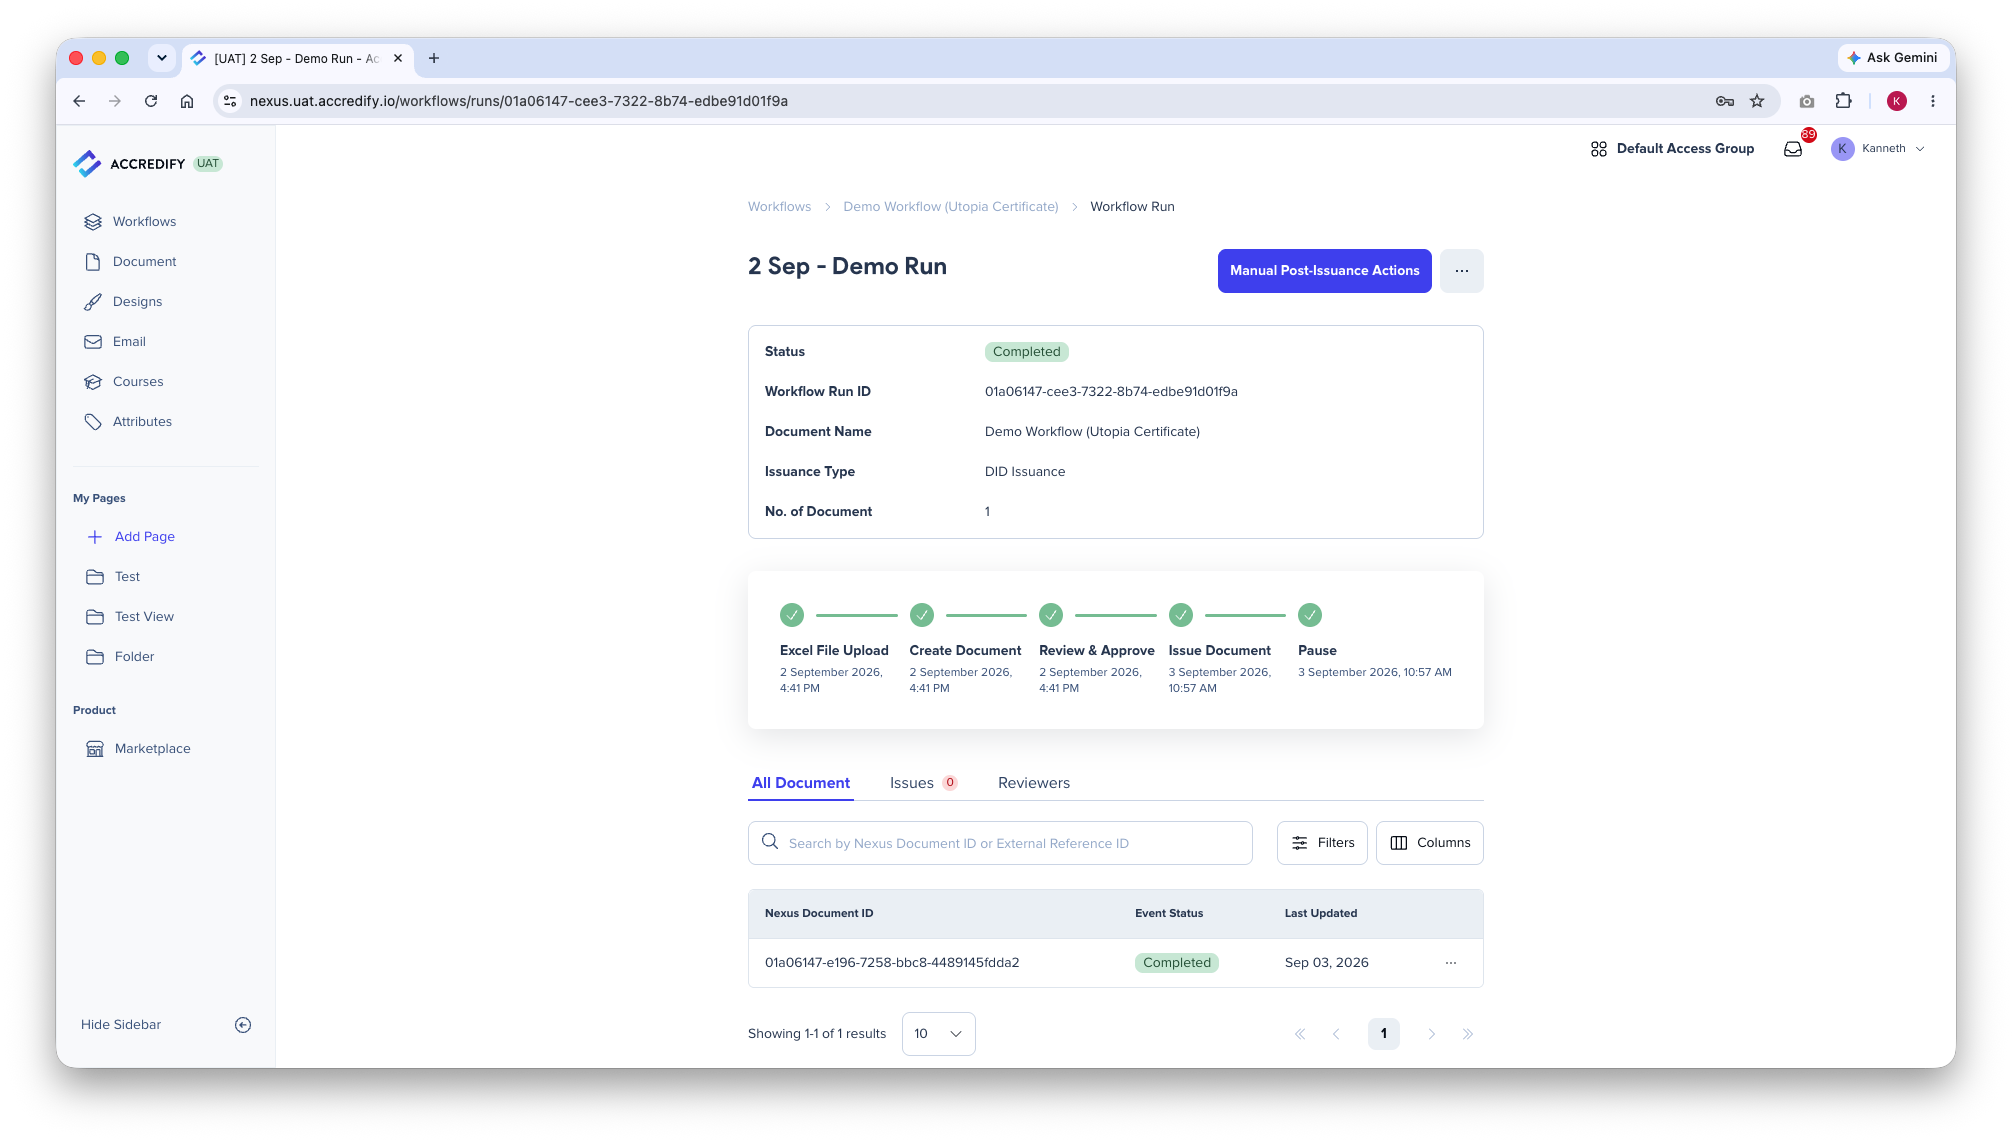
- 3 When the Workflow is triggered, it will run until completion. Action cards that have Run manually after issuance ticked will not be executed.
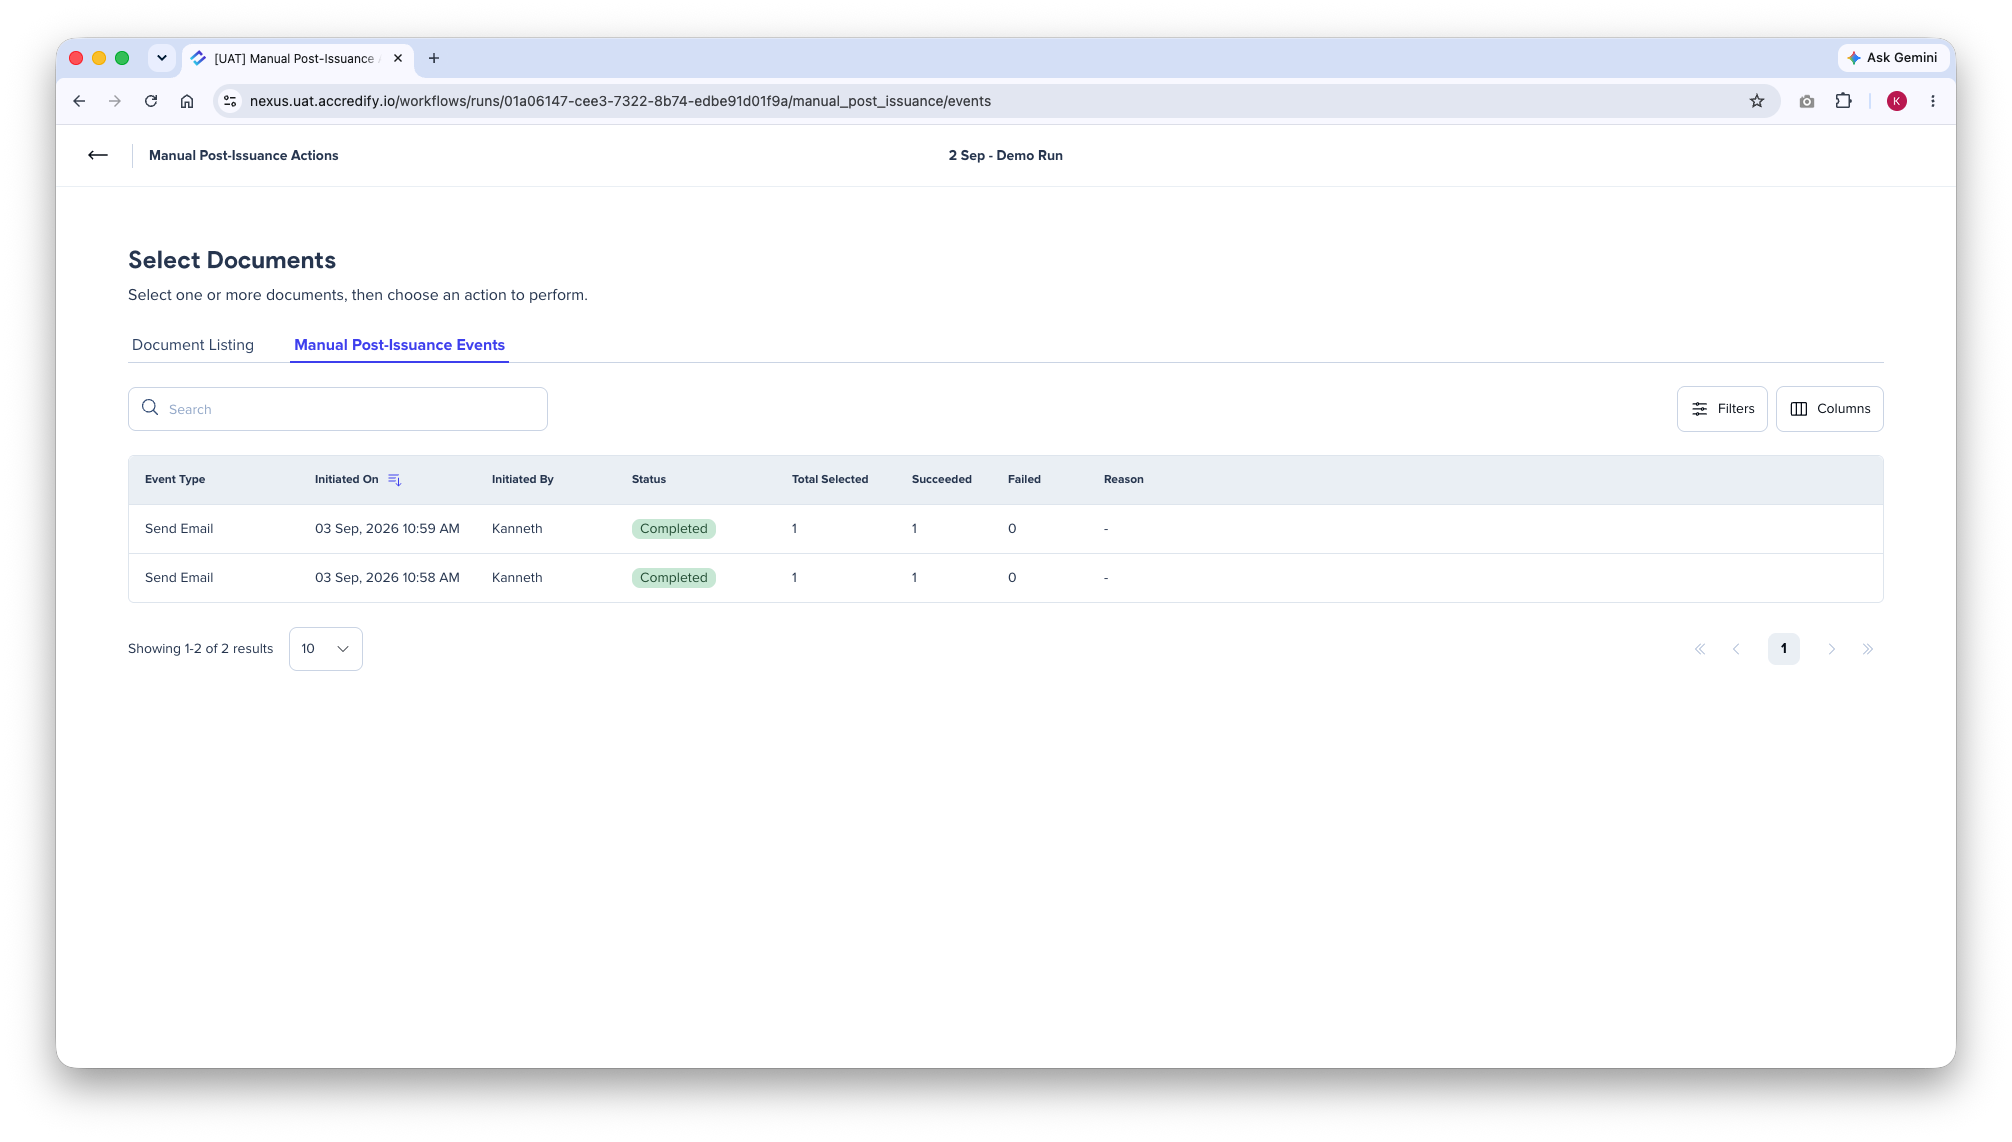
- 4 Click on the Manual Post-Issuance Actions button at the top right corner of the Workflow Run to manually trigger these actions for specific credentials.
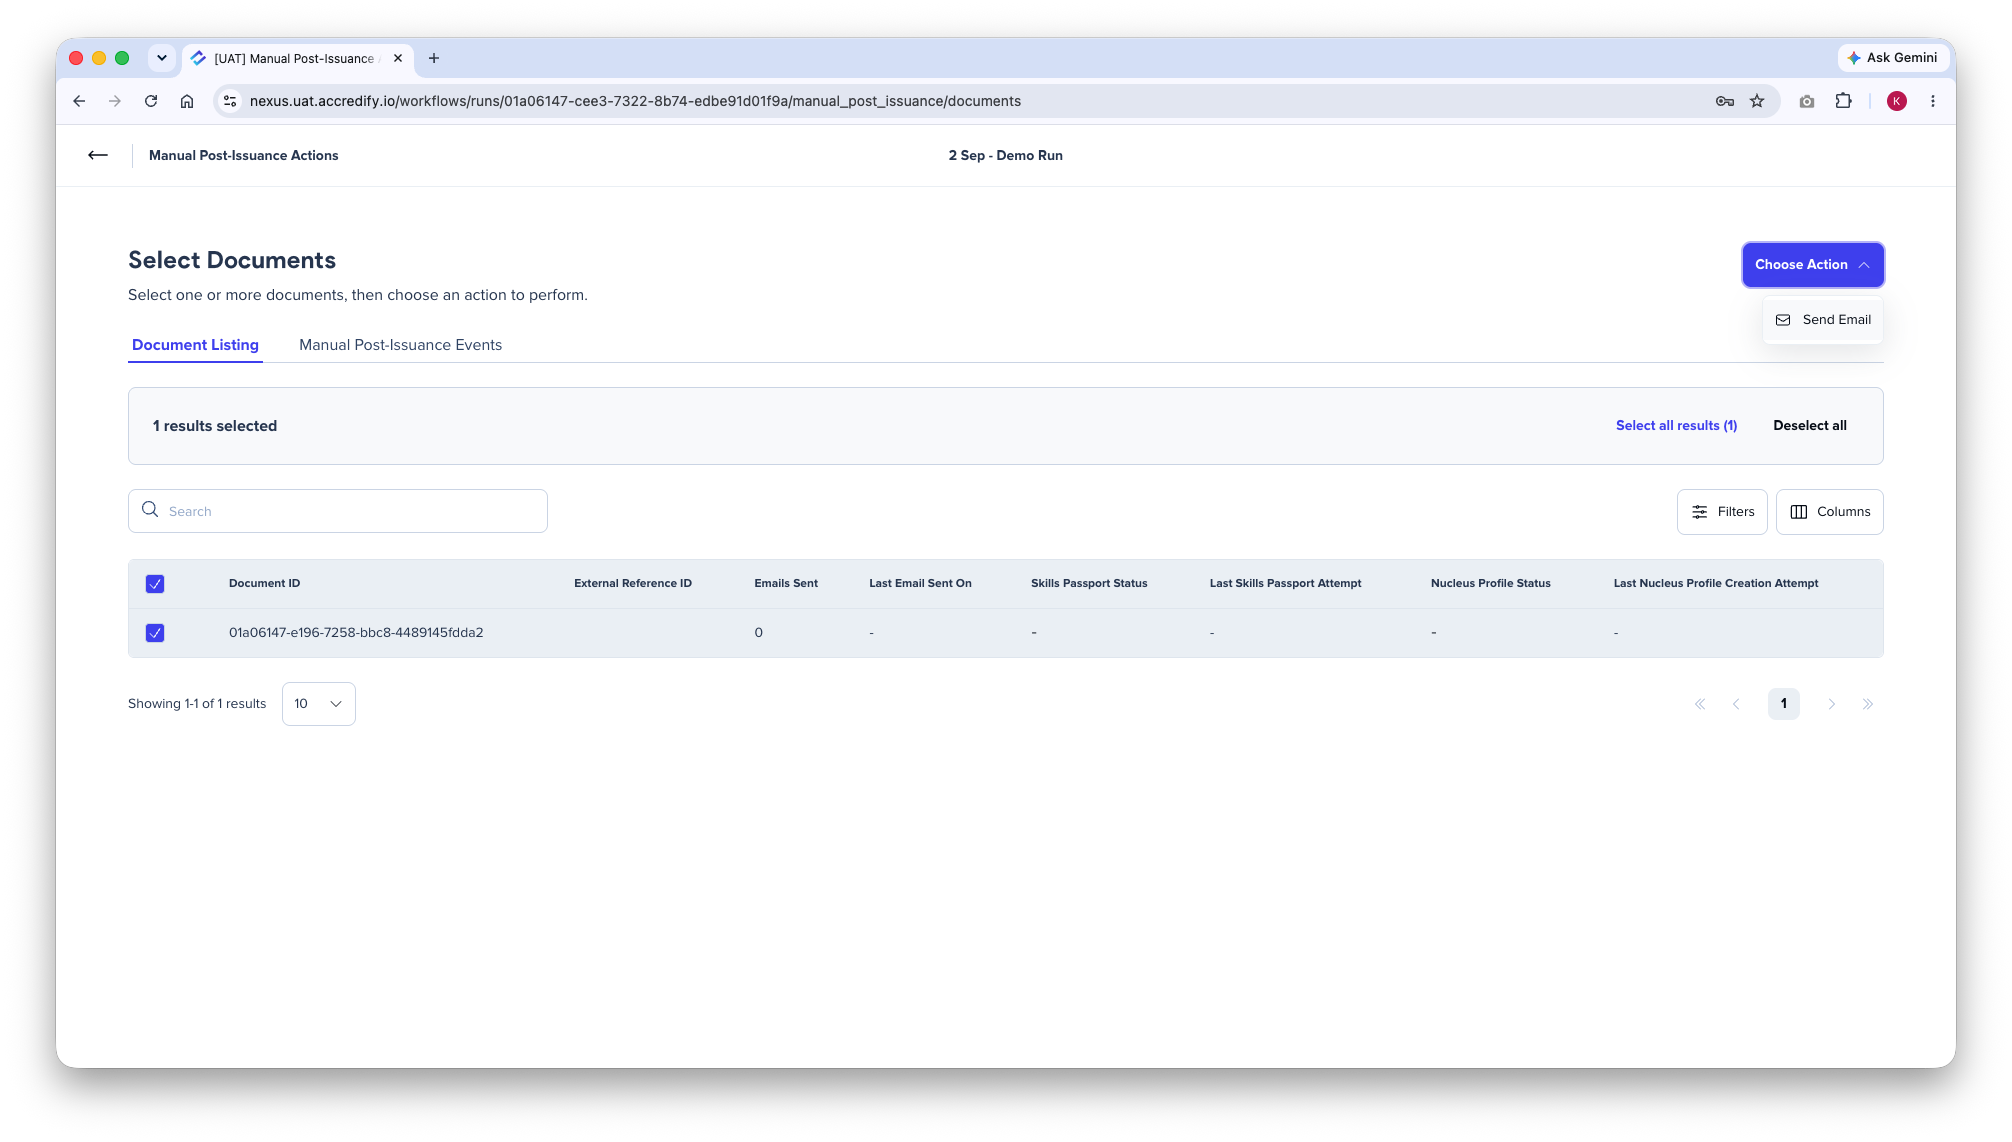
- 5 Select the relevant credentials and choose which action to run on them. You can search for a specific credential via the Search bar, or adjust your view with the Filters and Columns buttons, i.e. to show Recipient Name first on the list.
- 6 The Manual Post-Issuance Events tab keeps a history of every action taken and when it was taken. This means you can check which credential has already been emailed before, or otherwise.
Workflows: Resend EmailNew
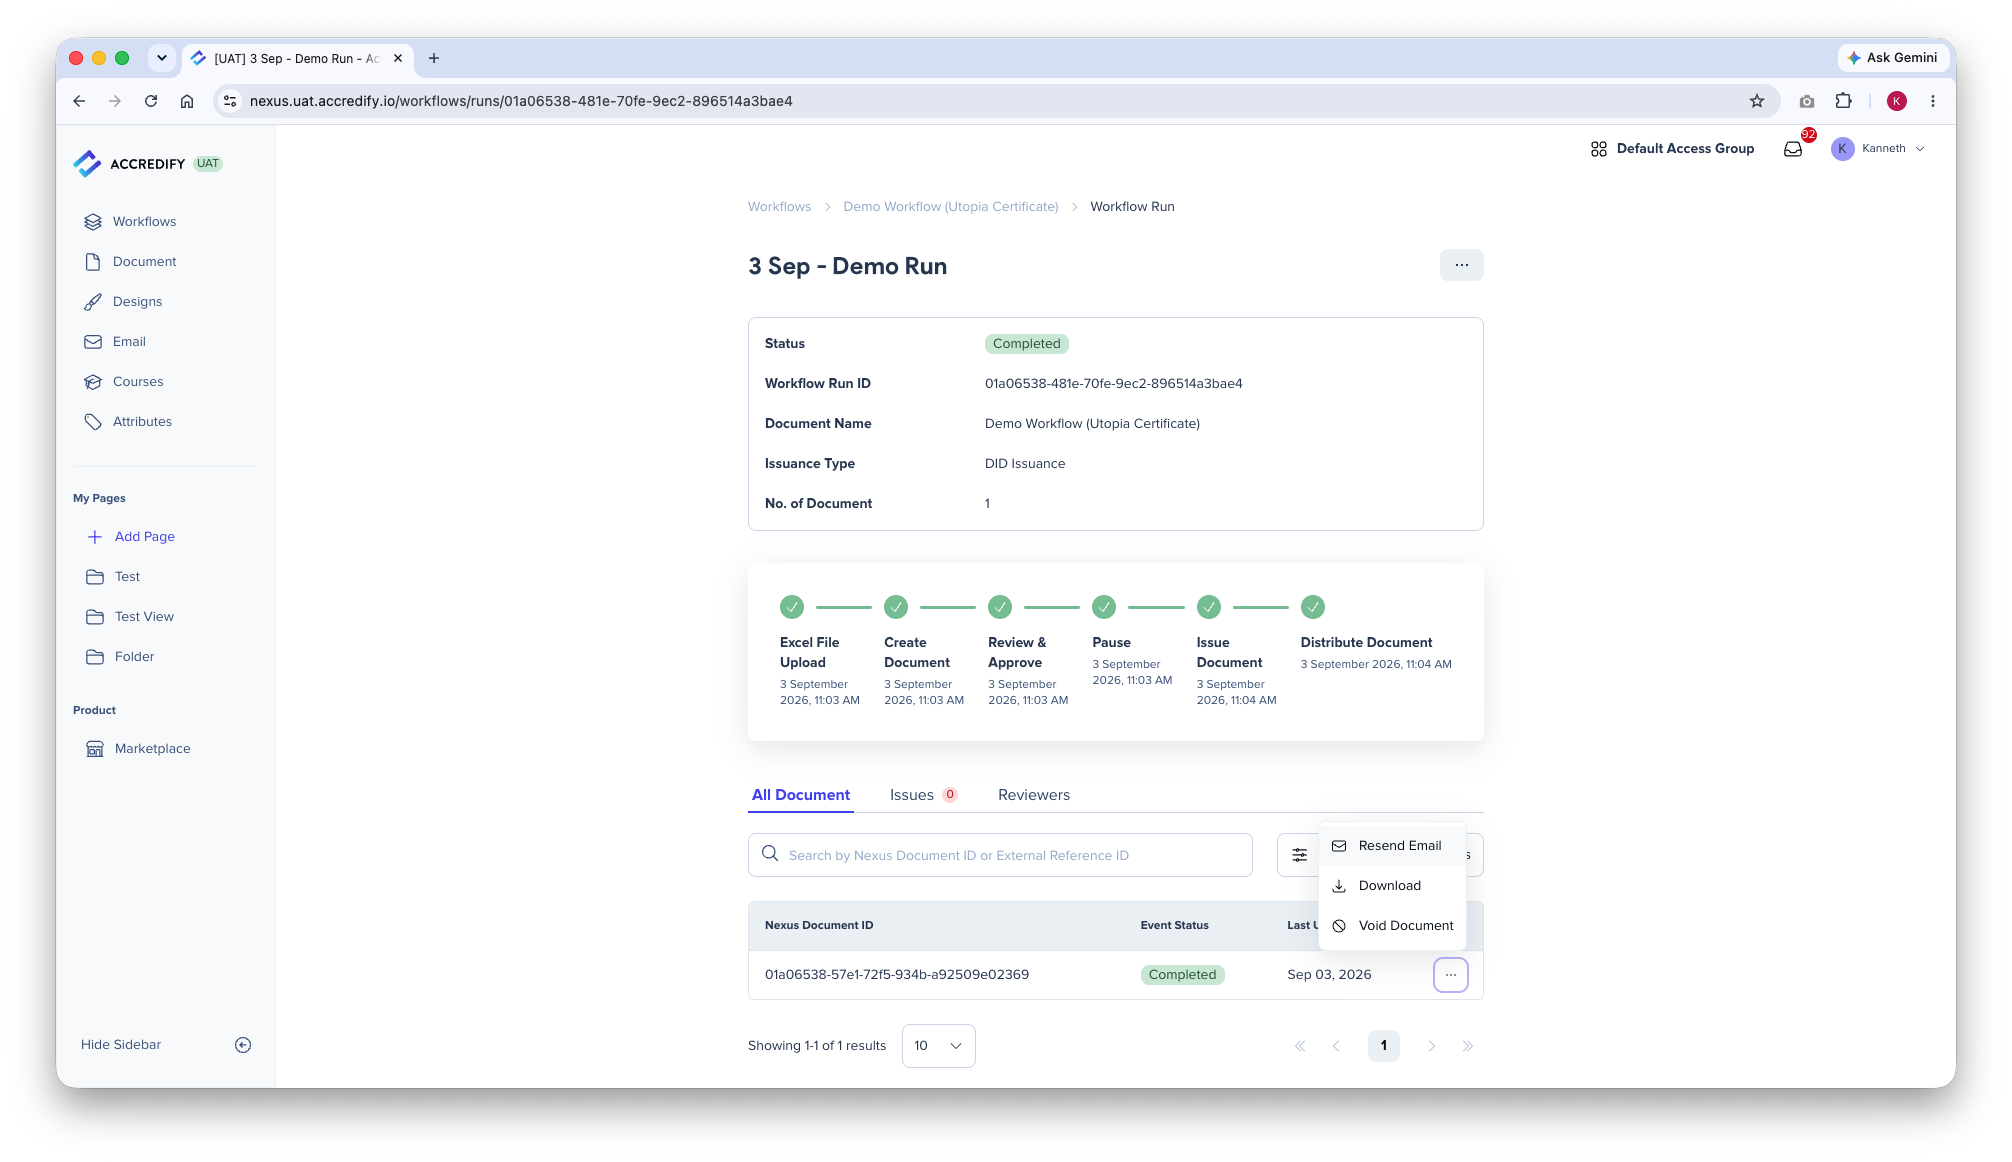
Users can now resend the original distribution email to recipients with Resend Email! Open a completed run, click the … menu beside any document issued under it, and click Resend Email.
Two important things to note:
- ! This option does not appear if Run manually after issuance is ticked on that Workflow’s Send Email card, because the email can be sent again through Manual Post-issuance Actions instead.
- ! A resent email always uses the Email Template the credential was issued with, even if the Workflow has been updated with a new Email Template.
Workflows: Delete RunNew
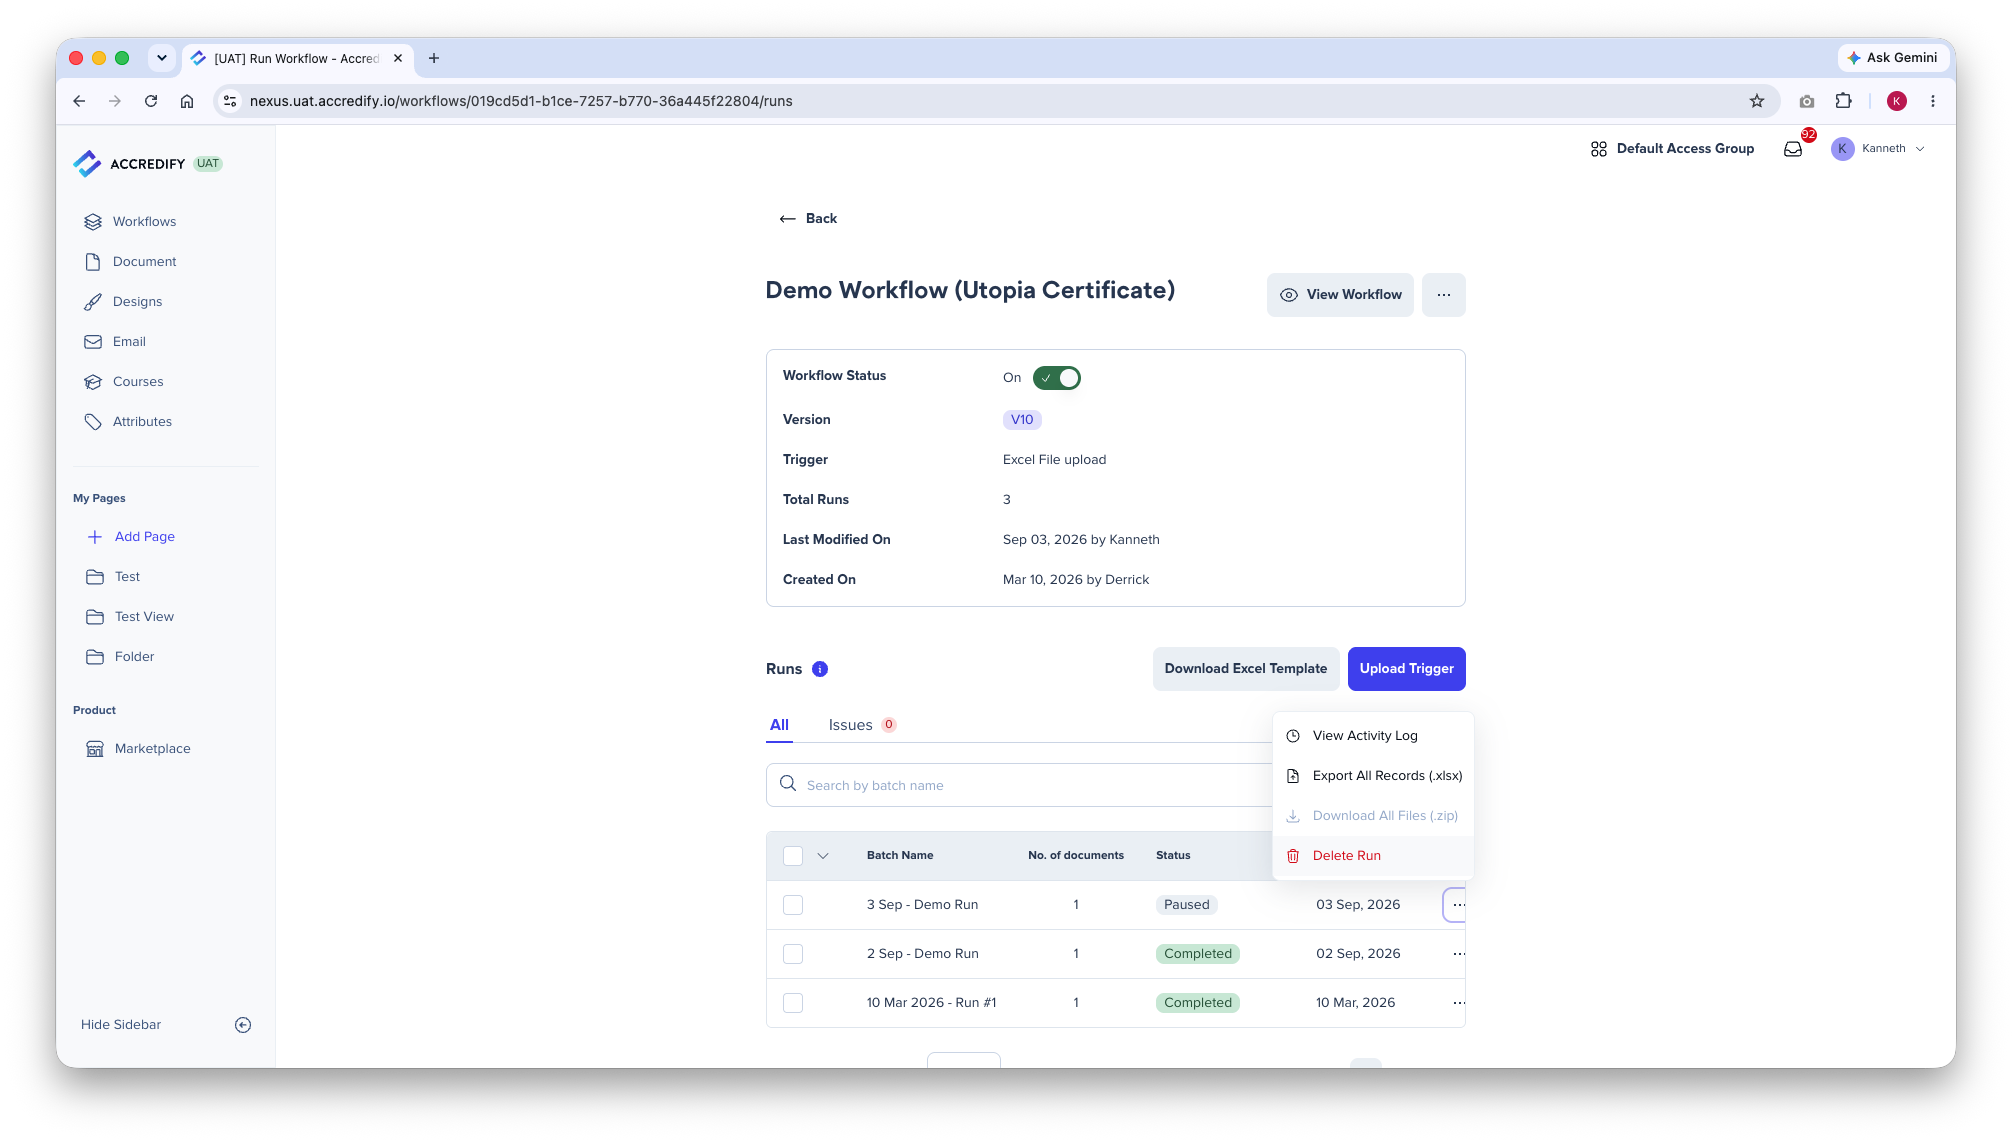
Are abandoned Workflow Runs cluttering up your Workflow history? Now, you can delete these incomplete Runs with Delete Run! Open a Workflow, click the … menu beside the run, and click Delete Run.
Runs that were started and abandoned due to errors used to remain on your Workflow’s Run list. Not only did this make the Run list messy — it also created the risk of other users resuming an abandoned run by mistake, thinking that it wasn’t completed.
Runs that have reached the Issue Document stage or beyond cannot be deleted. Once a credential has been officially issued and signed, deleting its run would leave a gap in the audit trail. The option therefore covers only Runs that never reached this point.
Workflows: Failure WebhookNew
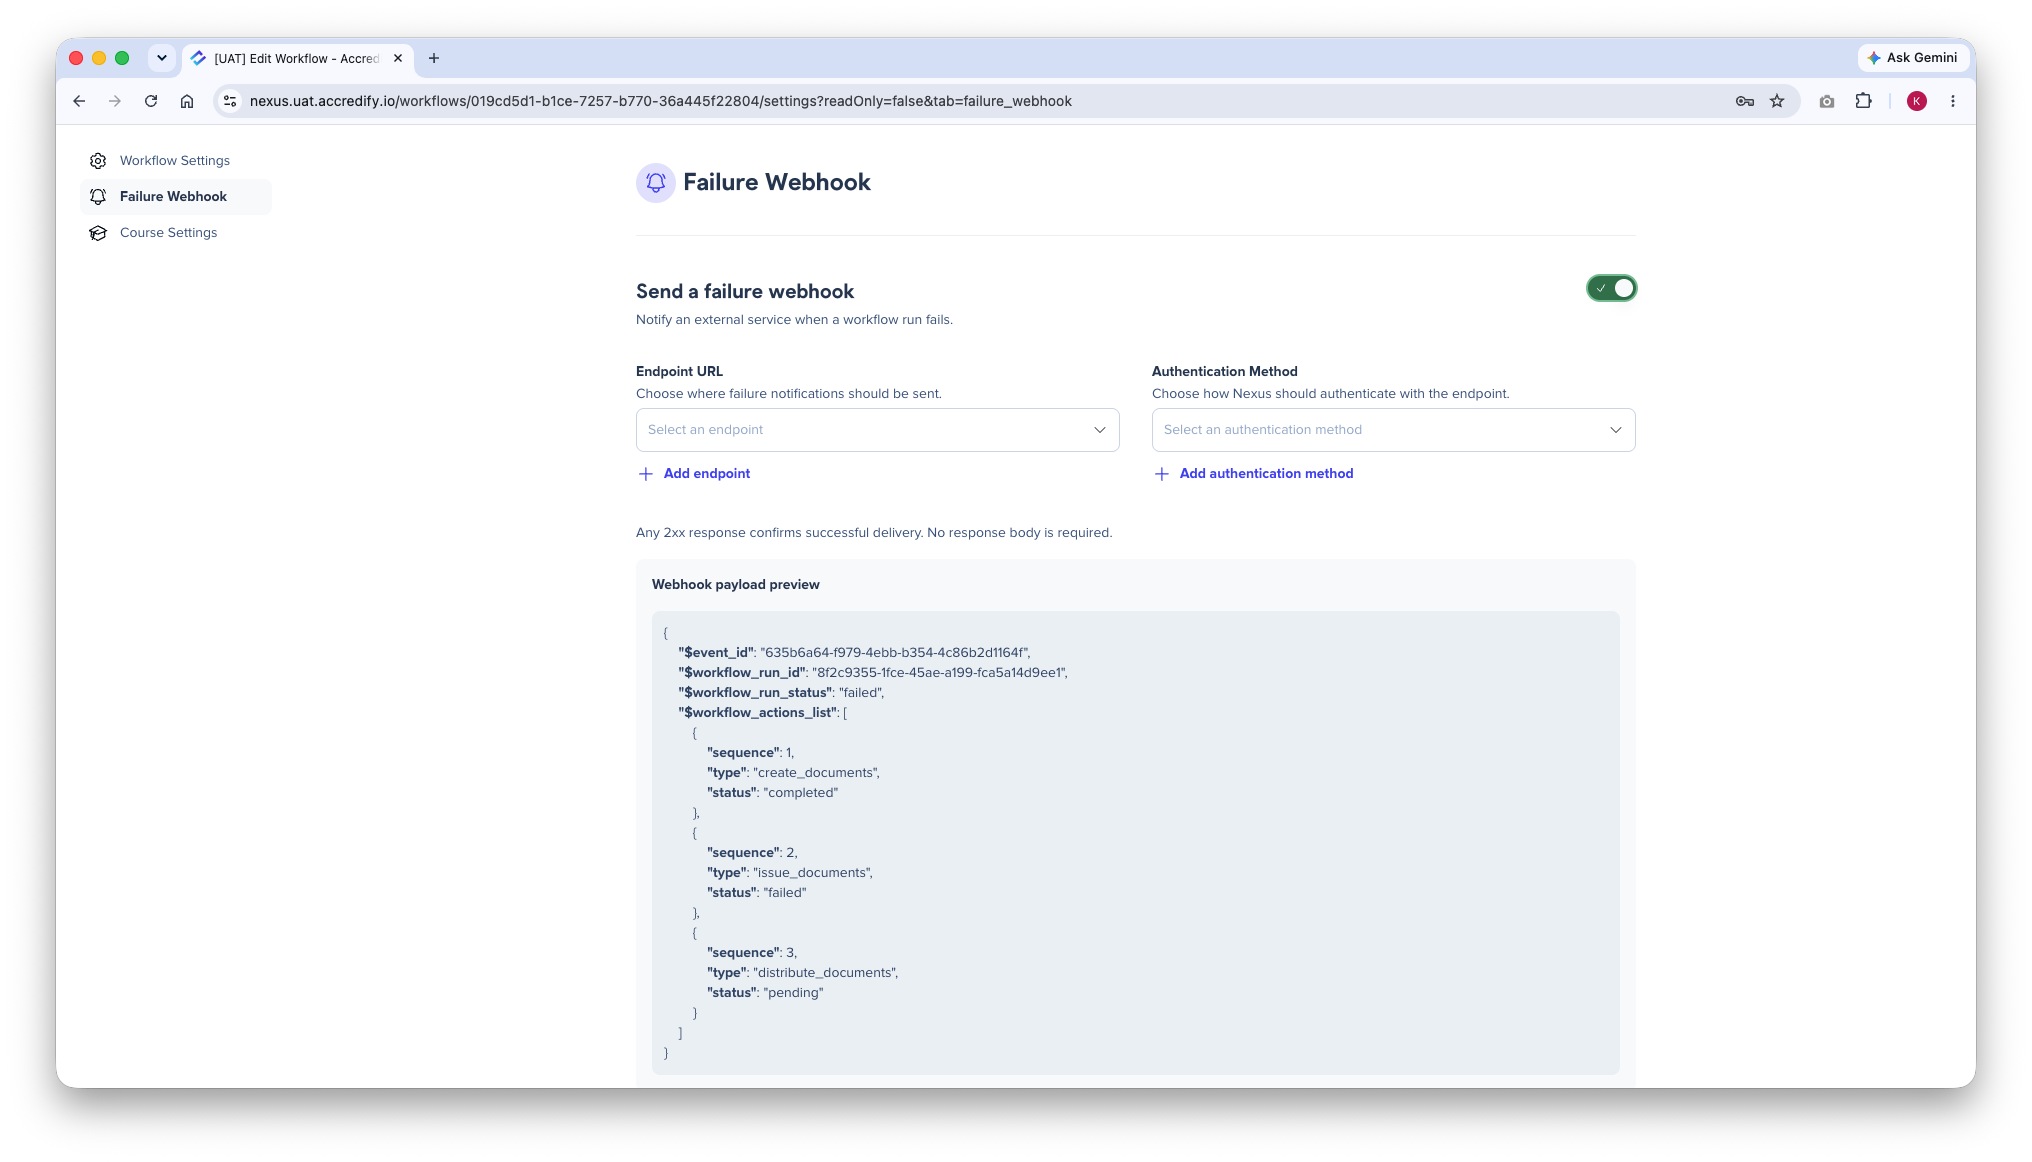
With the new Failure Webhook feature, you can now easily identify failed Runs as they can now be automatically reflected in your backend system. A webhook is a message that one system sends to another automatically when something happens, so manual checks are no longer necessary.
This matters most if you trigger Workflows through API. Those runs are started by your systems rather than by someone on Nexus, so a Run failure could go unnoticed until somebody logs in to check or if a recipient complains about not receiving their credential.
Here is how to set it up.
- 1 Edit an existing Workflow, or create a new one.
- 2 Open the Settings tab and select Failure Webhook.
- 3 Toggle Failure Webhook on.
- 4 Add your endpoint URL and your authentication method.
Workflows: Blockchain IssuanceNew
Blockchain Issuance lets you issue blockchain-based credentials yourself. The setup used to be a managed service that we handled for you. Now, you can do it without needing to wait for us!
Here is how to set it up.
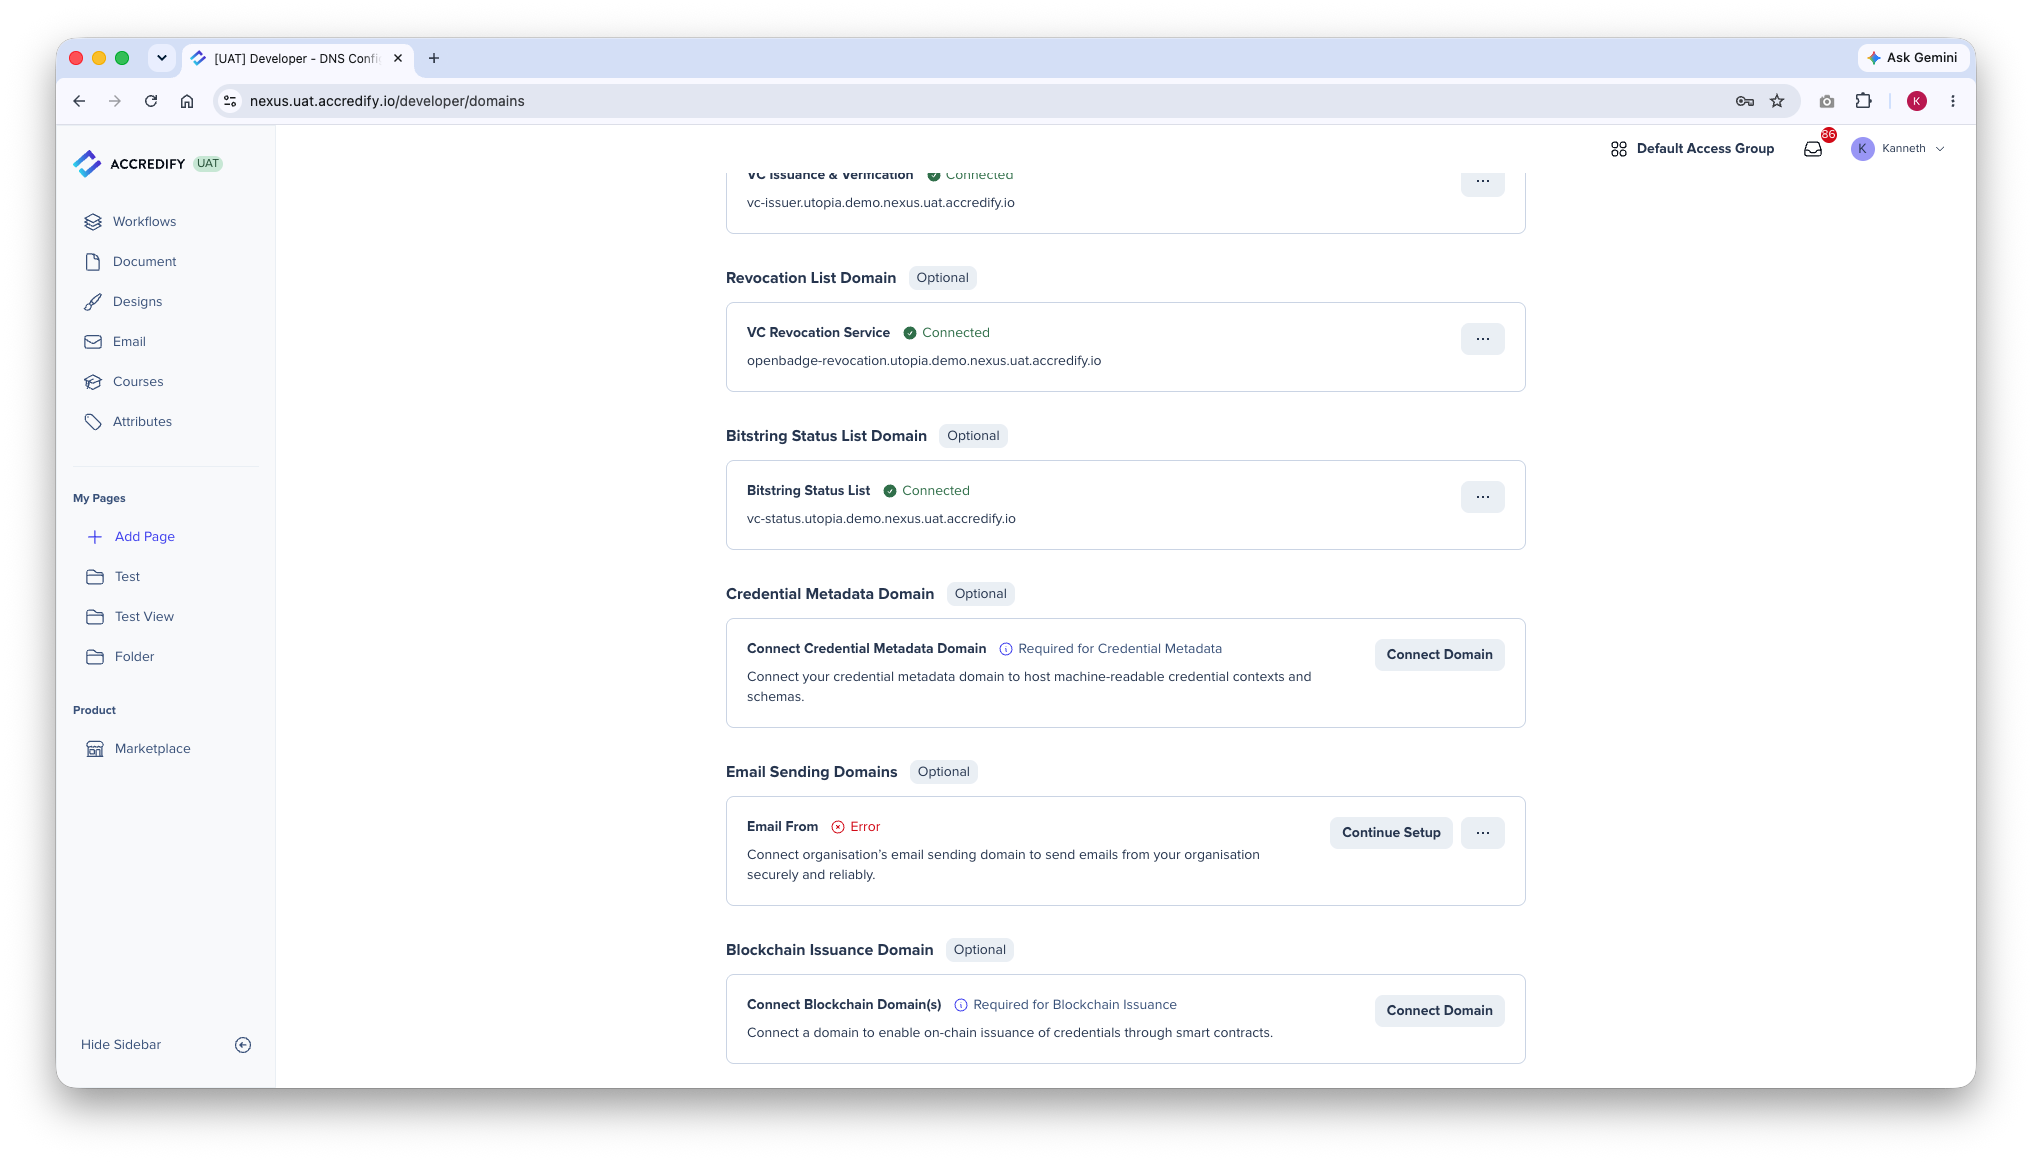
- 1 Go to Profile menu → Developer → DNS Configuration and set up your blockchain issuance domain.
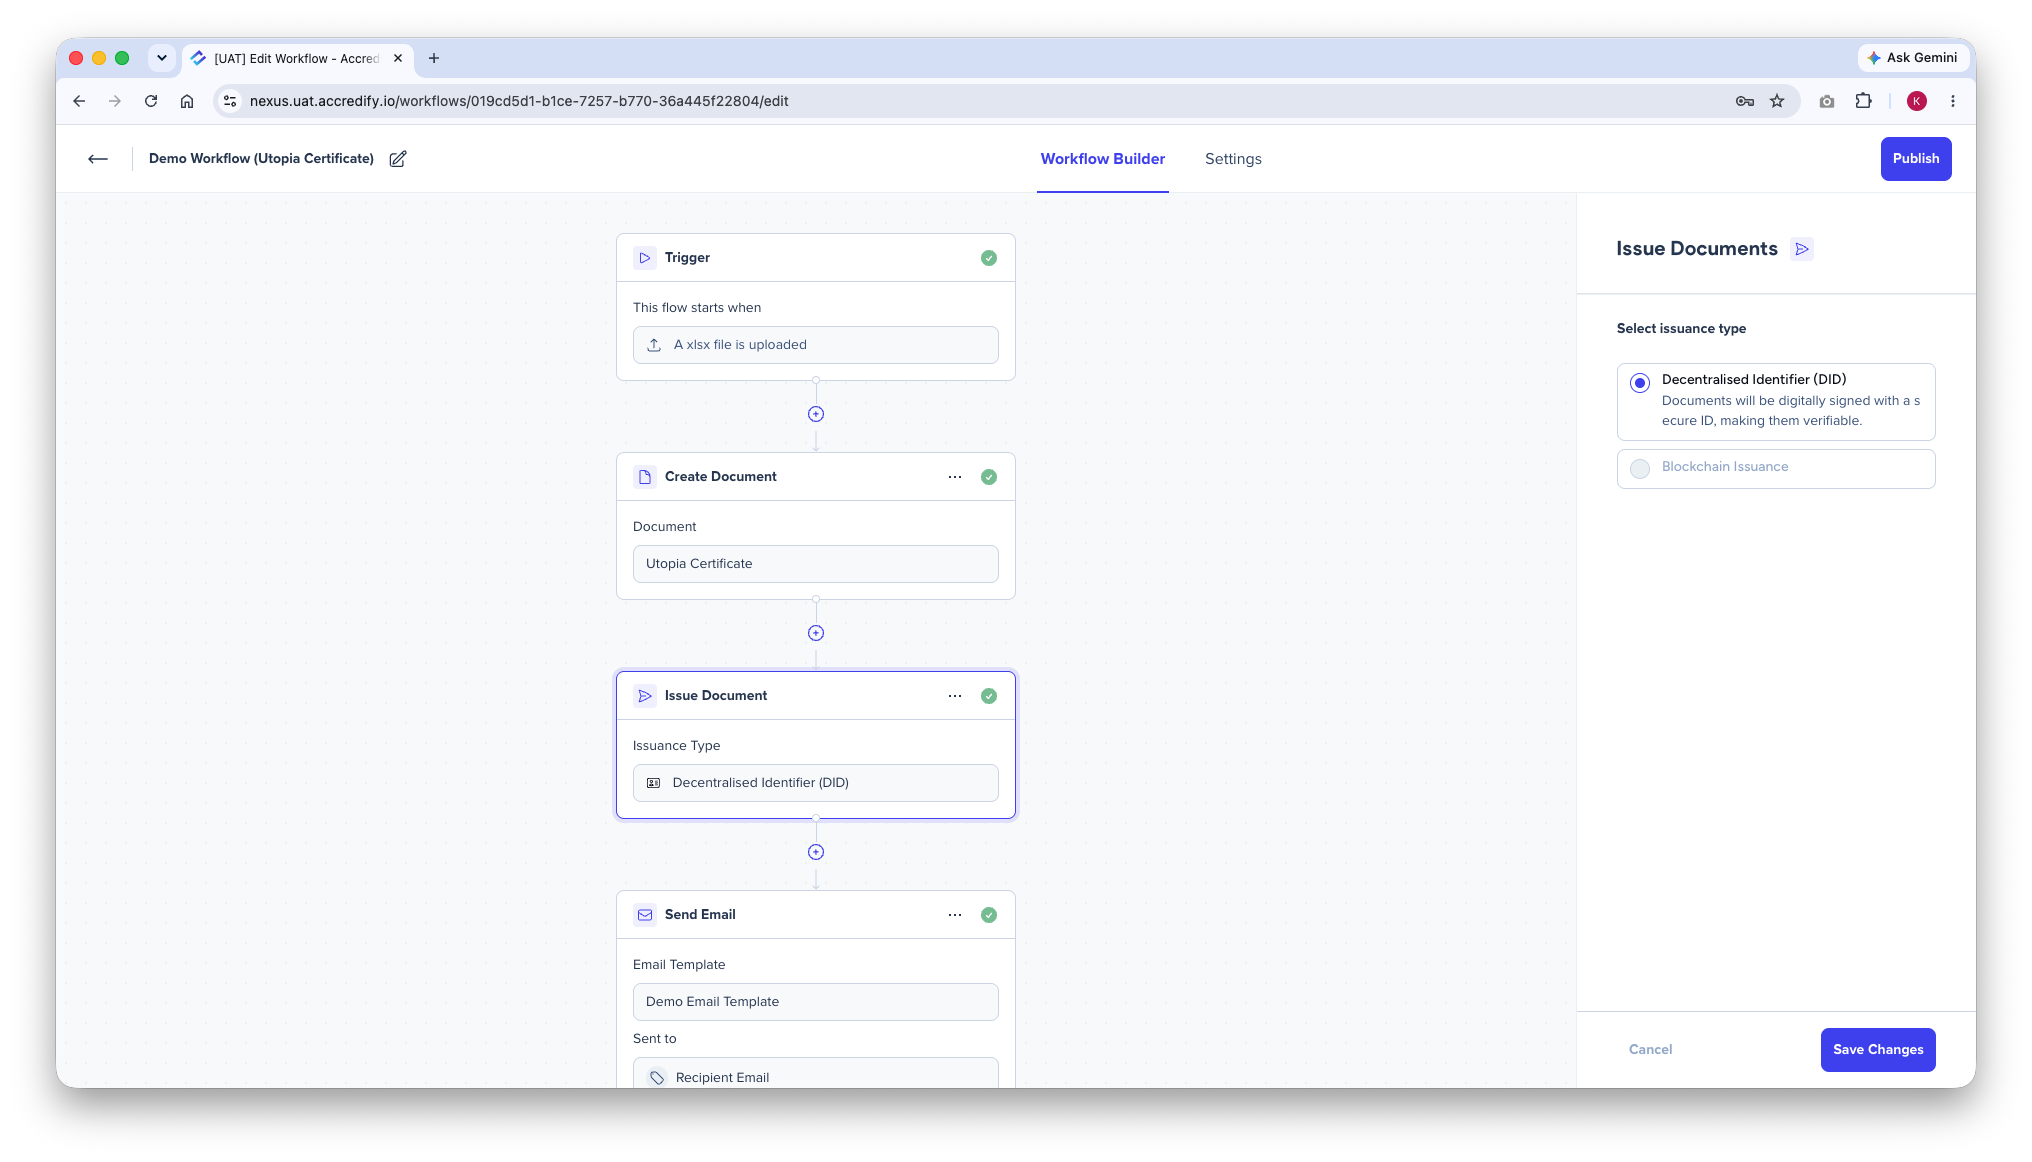
- 2 In any Workflow, open the Issue Document card and select Blockchain Issuance as the issuance type.
Settings > Developer: W3C Verifiable Credentials Data Model 2.0New
You can now issue VCs compliant with the W3C Verifiable Credentials Data Model 2.0 (VCDM 2.0) standard, an emerging international VC standard. This ensures your VCs adhere to specific credential schemas like ACRA’s schema for Corporate Entity VCs, and IMDA’s schemas for Citizen and Corporate Representative VCs.
Set up the issuance of W3C Verifiable Credentials Data Model 2.0 under Profile menu → Developer → DNS Configuration → Credential Metadata Domain and Bitstring Status List Domain.
Workflows & Document Templates: mDoc IssuanceNew
You can now issue mDocs (Mobile Documents) yourself, straight from Nexus! An mDoc is a credential built to be held in a wallet app on a recipient’s phone, rather than opened as a file or a link. It follows ISO/IEC 18013-5, the international standard behind mobile driving licences and other phone-based IDs.
Issuing mDocs used to be a managed service too: there was nothing in Nexus for you to set up yourself. Now it’s simply a document type you select, so you can issue mDocs on your own.
Setting this up takes two steps. You create the mDoc Document Template first, and it then becomes available as an option inside your Workflows.
Here is how to set it up.
-
1
Go to Document on the left navigation bar, click + Create Document, and select mDoc (Mobile Document).
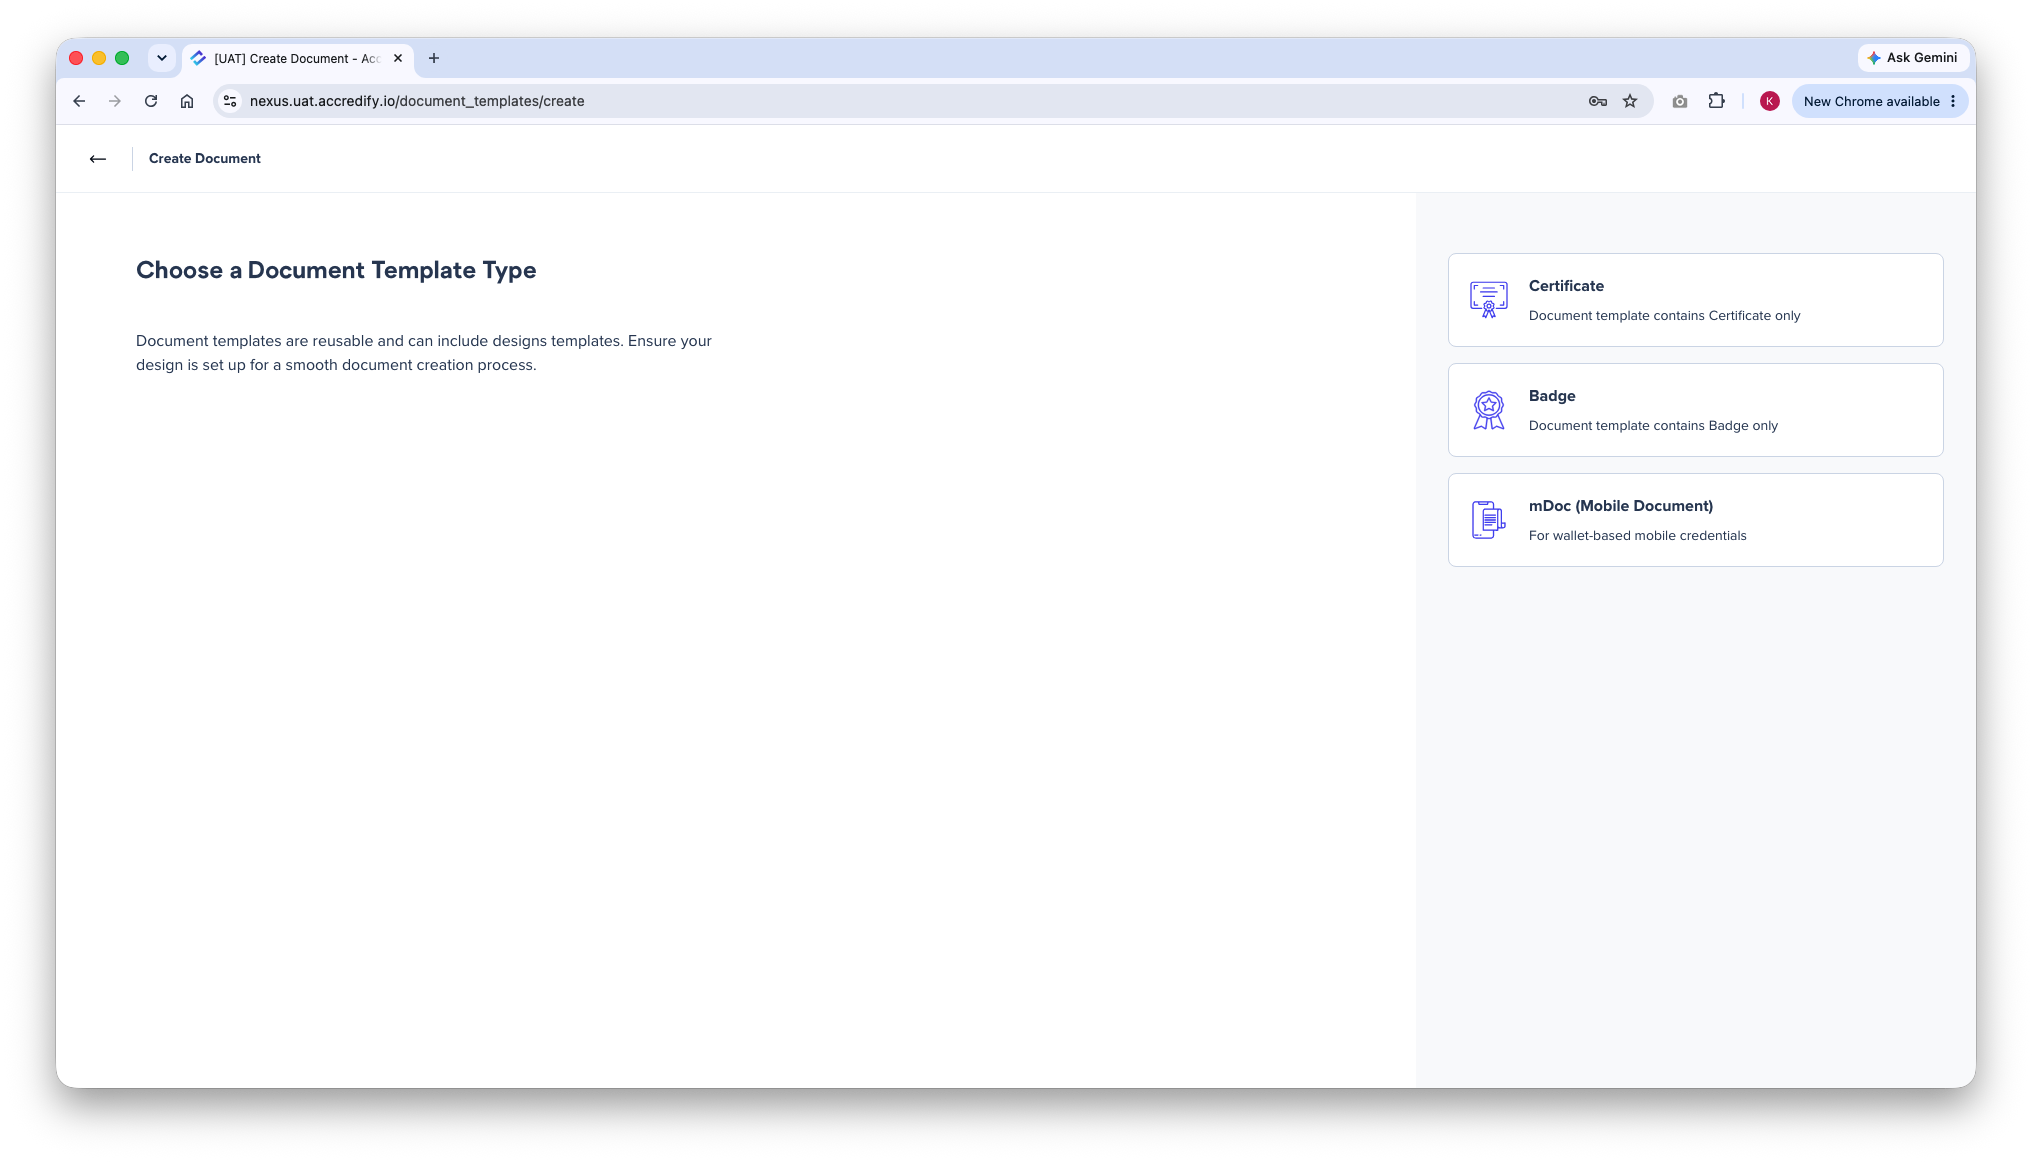
Step one: creating the mDoc document template -
2
Go to Workflow, click + Create Workflow, open the Create Document card, and select mDoc (Mobile Document). Your mDoc template will only appear here once step one is done.
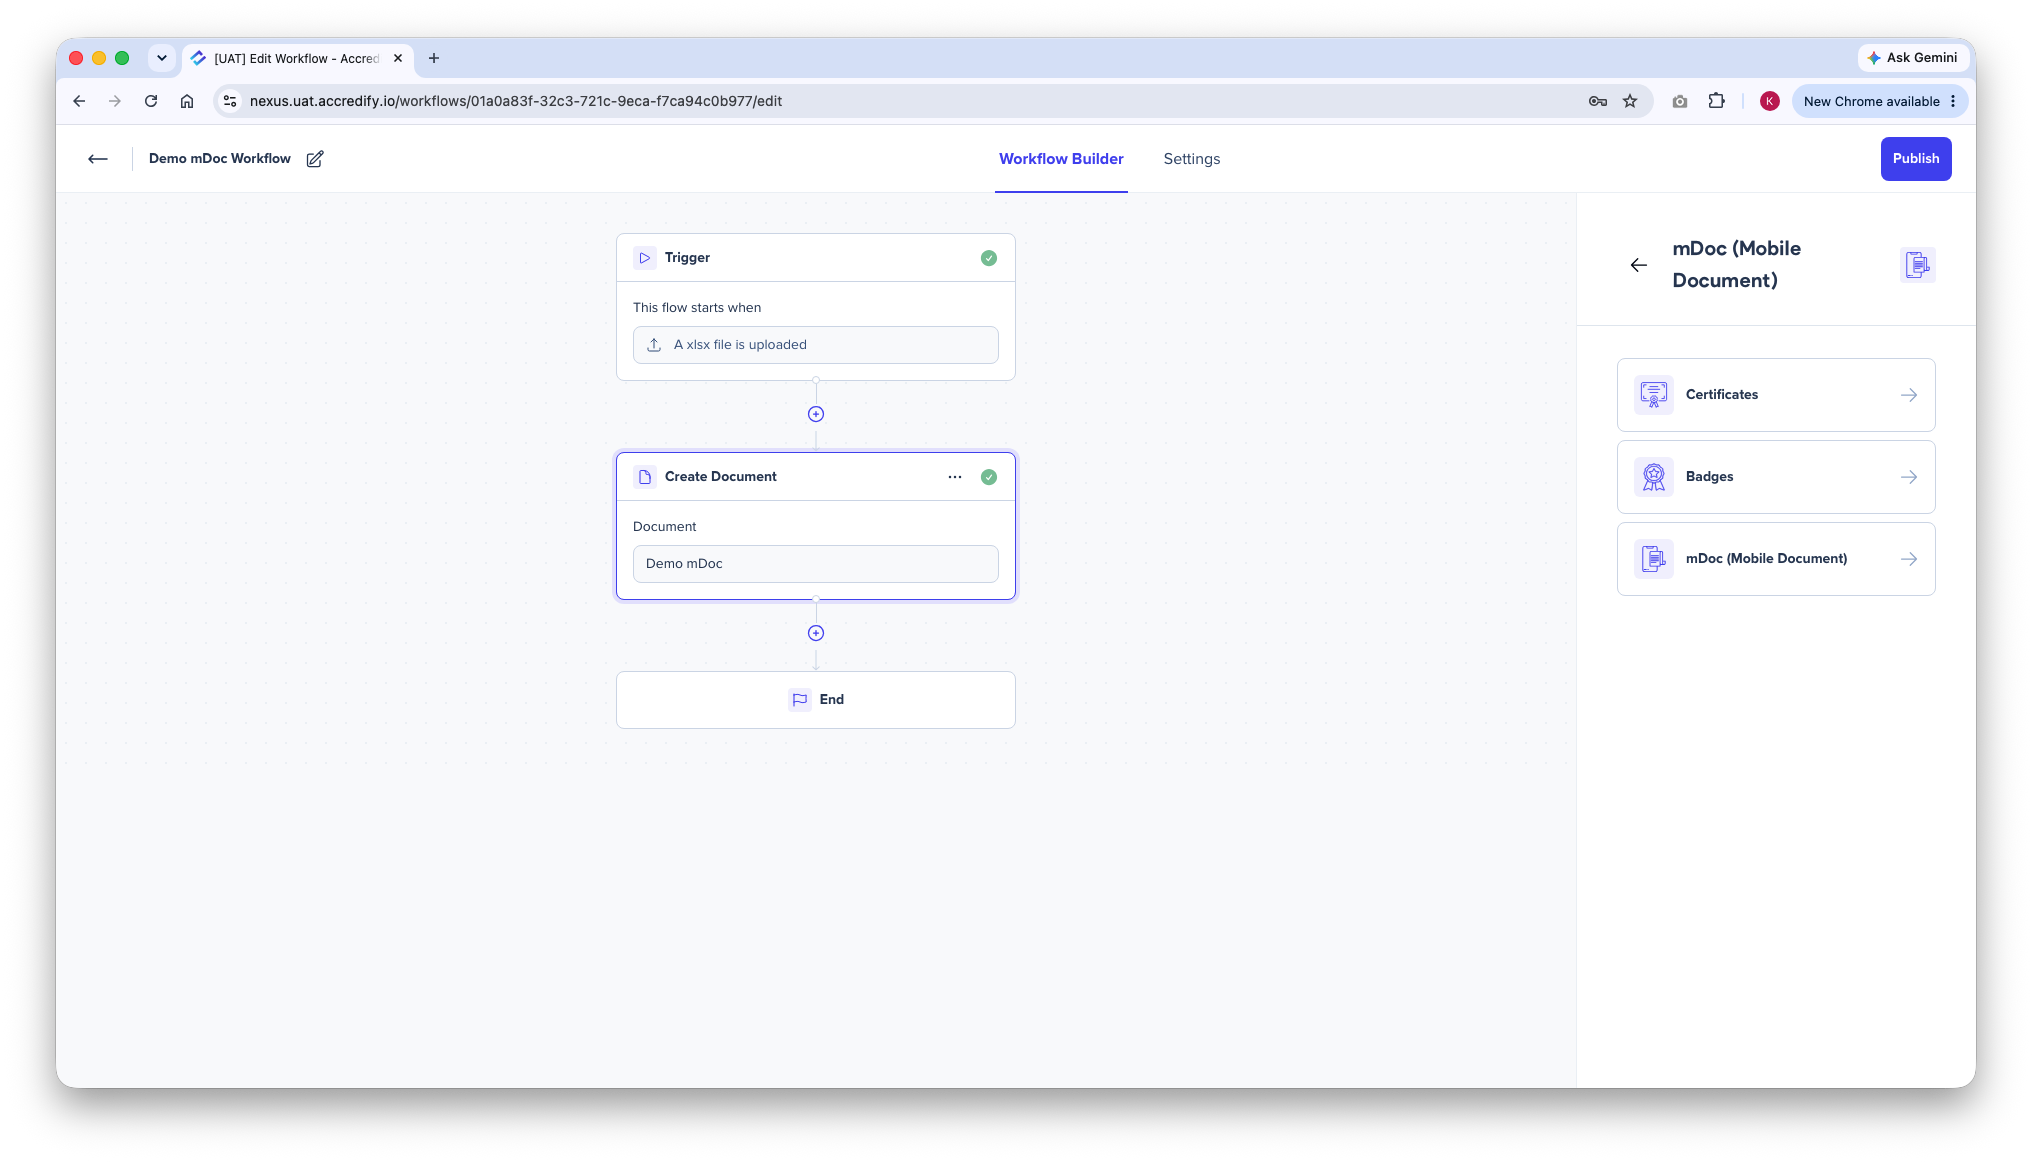
Step two: selecting mDoc on the Create Document card in a Workflow
Marketplace: SWDA Training Provider AccessNewAccount Manager
Training providers can now apply through Nexus to issue credentials into SWDA’s Career & Skills Passport (CSP). CSP is Singapore’s national education wallet, run by the Skills and Workforce Development Agency (SWDA). Go to Marketplace on the left navigation bar, open SWDA Training Provider Access, and click Apply for SWDA Access.
Do approach your Account Manager to facilitate your application to SWDA. After you submit the application form, Accredify will assist with the backend integration between your organisation’s Nexus account and SWDA’s CSP. You can begin issuing credentials for courses approved by SWDA into CSP once the integration is complete.
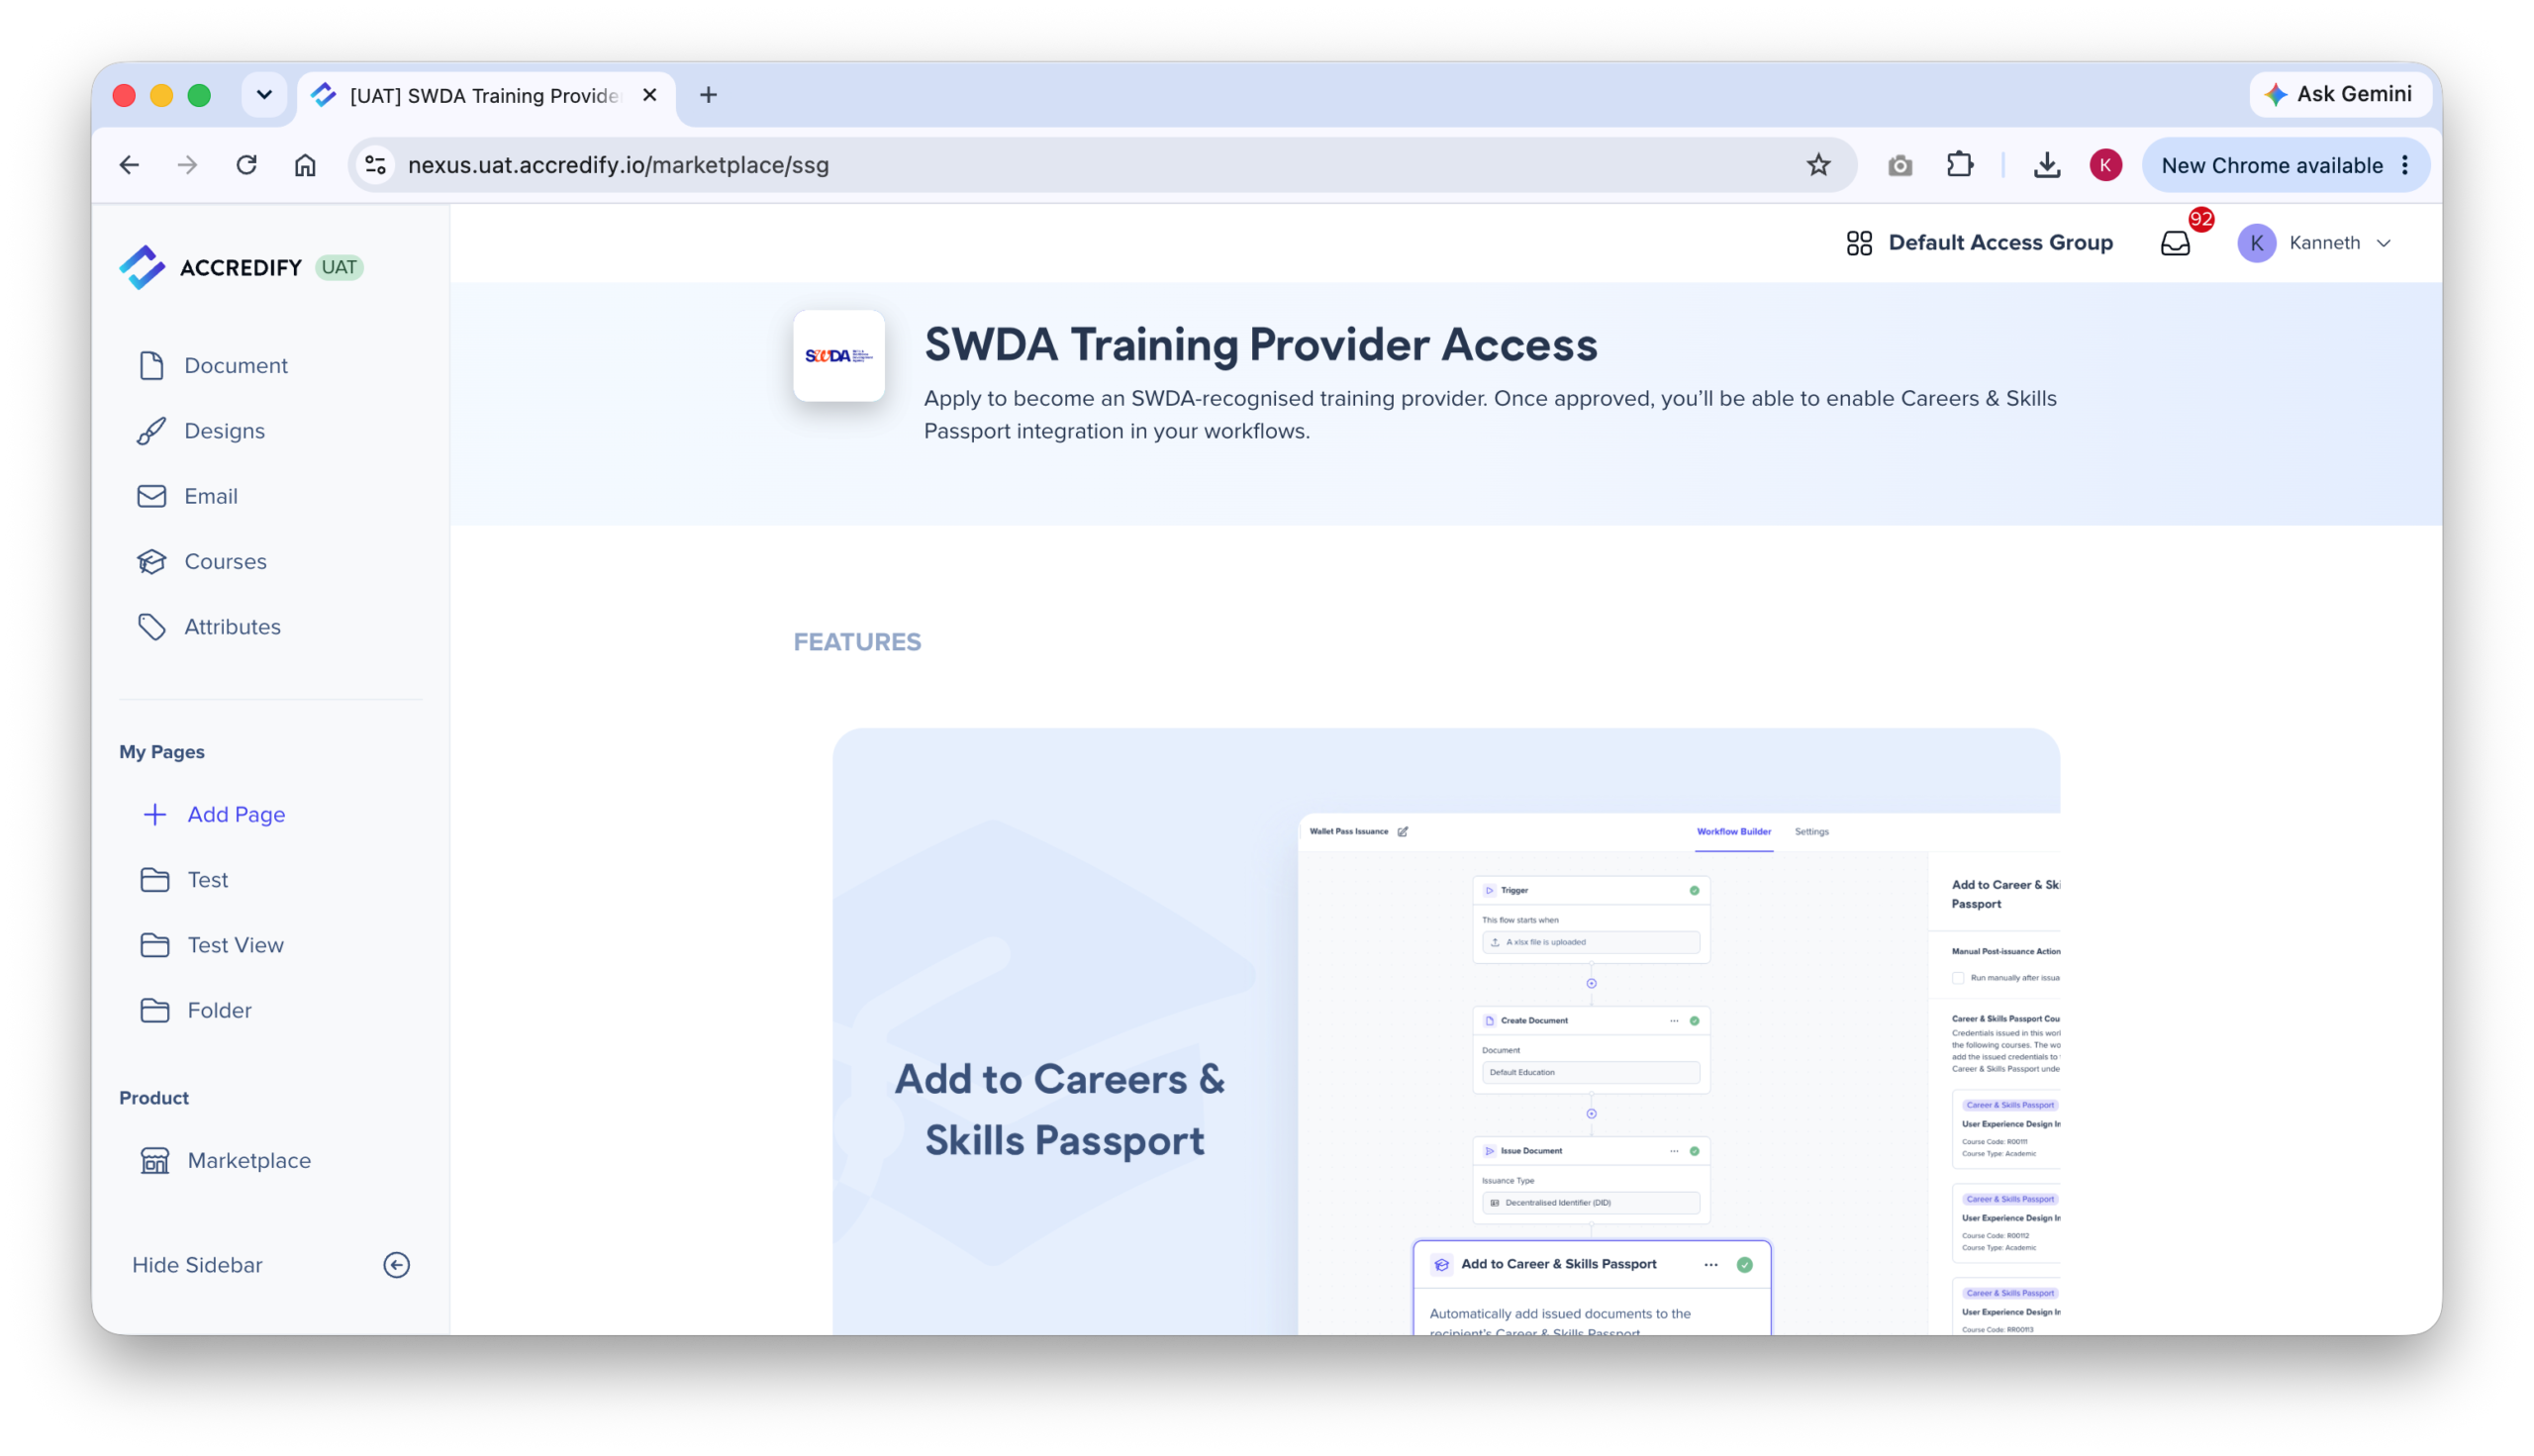
Nine new features are waiting for you to try!
Try on Nexus →
Nucleus
Nucleus also received an update! Recipients can now see, at a glance, that their Nucleus account truly belongs to them.
Manage Identities: Private KeyNew
Nucleus now shows you part of your private key, under Profile menu → Manage Identities. A private key is the piece of cryptography that makes an account yours and nobody else’s. Showing part of it makes your ownership visible: a Nucleus account belongs to you.
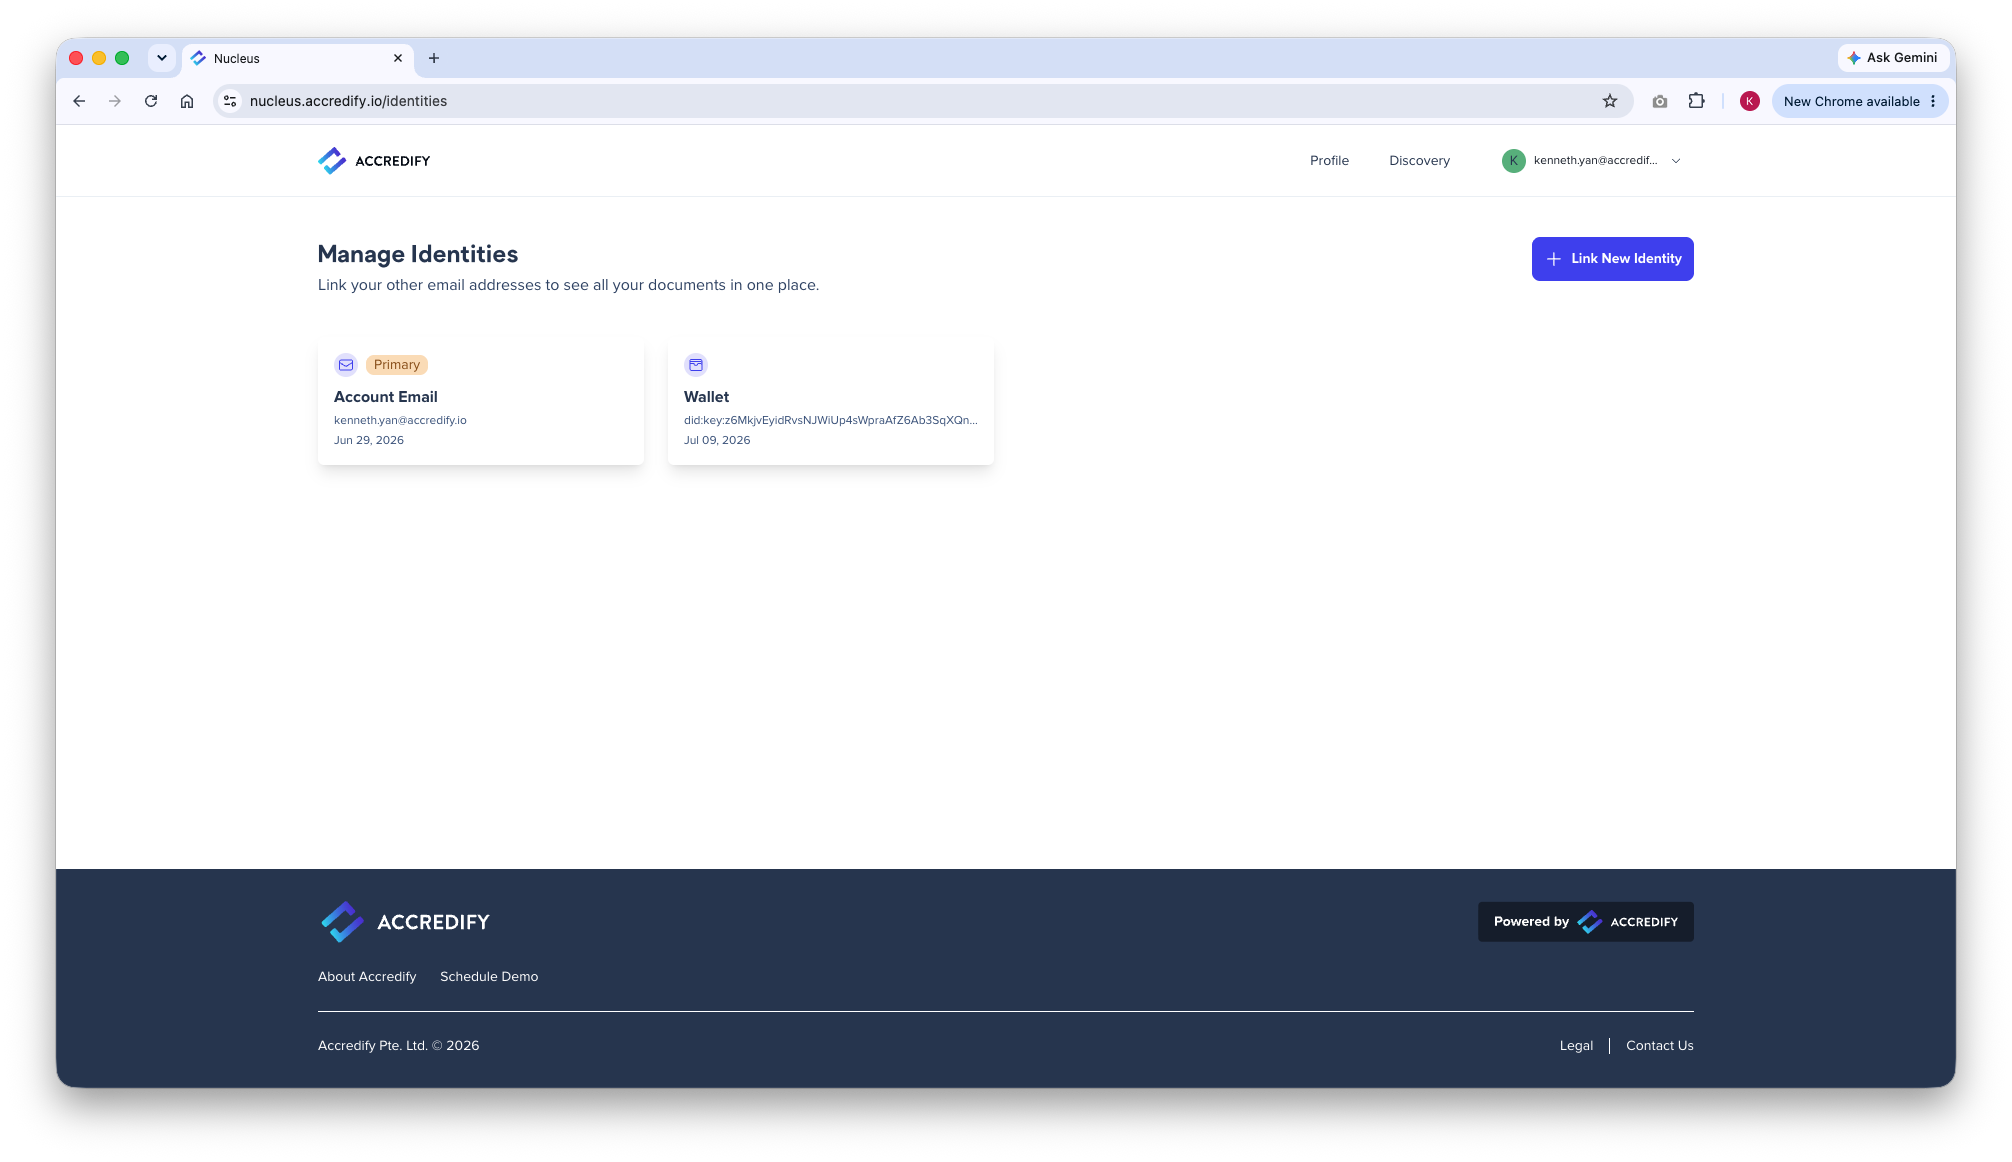
A new update is waiting for you on Nucleus!
Open Nucleus →That is everything from Q2 and Q3! Two quarters of it, so thank you for reading this far. If there is something you would like to see in Nexus or Nucleus, or something we could do better, we would like to hear it. Happy issuing, and see you in the next update!
Got a feature in mind? Tell us what would make issuing and verifying easier for your team.
I have a suggestion! →